

Installing a sink in the kitchen
No kitchen is complete without a kitchen sink. A stove for cooking and a kitchen sink are those places for which the housewives spend the greatest amount of time, something without which it is impossible to imagine a kitchen. Often the owners, wanting to save their money, prefer to make repairs by their own efforts. Of course, there are certain repairs that only a specialist can handle. However, many processes are easy to master for any sensible host. The installation of a sink in the kitchen is no exception. Making repairs, the sink in the kitchen can be installed without problems on its own, you just need to know certain nuances of its installation. After reading this article, you will familiarize yourself with all the subtleties and be able to complete the installation yourself.
to contents ↑Types of kitchen sinks
To date, there are four main types of kitchen sinks. Before planning a repair, you should familiarize yourself with all existing options, and then, based on design ideas, room capabilities, and your own preferences, make the final choice.
The following types of kitchen sinks are presented on the goods market:
- Laid on sink. In this embodiment, the product is superimposed on a kitchen cabinet, which by design has only side faces and a front part, in the form of a door. Such a sink acts as the top of the pedestal. Most often made of stainless steel.
Important! Recently, models made of ceramics and granite have been popular. This design is the easiest to install and the most affordable.
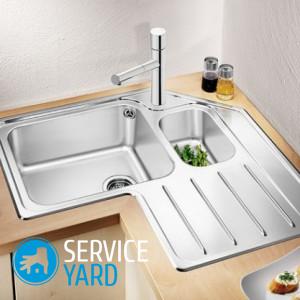
- Mortise sink. In this case, the name speaks for itself. During installation, the product is mounted in a hole previously cut in the countertop. Mortise sinks look more stylish than overhead sinks, they are more convenient to use and care. The only difficulty is that it will be necessary to cut a hole in the kitchen worktop with an electric jigsaw.
Important! Since the countertop is quite expensive, the work should be carried out with maximum accuracy and accuracy. In the case of an incorrectly cut hole, you will have to replace the entire countertop. As a rule, such sinks are made of granite, ceramics, stainless steel, polymer, artificial stone and other materials.
- Integrated sinks. Represent an integral design of countertops and sinks. They are quite popular when used in modern interiors. Such models are made individually in size and incredibly expensive.
Important! They can be made of acrylic, artificial or natural stone, stainless steel, filled with concrete. They look incredibly stylish and modern.
- Table sinks. In this case, the structure is mounted under the countertop, respectively - the upper kitchen surface has a solid look, there are no docking sides of the countertop and sinks.
to contents ↑Important! Such sinks can be made of stainless steel, a composite based on granite and acrylic, ceramics and other materials. They look advantageous and stylish, fit a modern laconic interior and any design ideas.
Basic rules for installing a sink
Whatever type of kitchen sink you choose, there are certain rules and recommendations for its installation.Of course, it is worth listening to them, since they take into account certain technical requirements - due to their observance, maximum practicality and comfort are achieved.
Here's what to consider when installing a sink in the kitchen:
- it is not recommended to place the sink in close proximity to the stove, because the contact of fire and water is not permissible;
- follow the rule of the working triangle, in this case it is recommended to place the sink between the refrigerator and the stove, leaving a working space between them;
- do not place the sink close to the refrigerator - its side wall will prevent comfortable washing of large dishes and the rule of the working triangle will be violated;
- the recommended free space of the working surface on both sides of the sink is at least 60 centimeters - in this case, you are provided with comfortable cooking;
- if you are limited in free space, it is preferable to install the sink closer to the refrigerator than to the stove;
- with proper planning of the space, the sink in the kitchen divides the entire working area into two parts, one of which is used for dirty work, and the second for serving dishes:
- place the dishwashing place as close to utilities and sewage as possible - this will prevent frequent blockages and leaks;
- choose the product according to the material of manufacture, take into account all its characteristics and how practical it will be specifically in your case, taking into account your household loads;
- do not forget about the simplicity of care, because often expensive and beautiful sinks are designed exclusively for admiring and unsuitable for contact with colored berries and vegetables, especially for natural stone products of light colors;
- choose a sink according to the design of the kitchen, depending on the kitchen furniture and worktop material - take the most suitable sink for washing dishes.
Mounting the mortise sink
If you opted for a mortise sink, the question arises, how to install the sink in the kitchen? If you know how to use an electric jigsaw, this will not be for you absolutely no difficulties. As a rule, all mortise sinks in their configuration have a template for cutting holes for the product. Using it, you can easily prepare the surface for installation.
For self-installation, you should adhere to the following sequence:
- Using the template that is in the package for the sink, determine the exact location of the sink. It should be borne in mind that the walls of the sink should not be in contact with the sides of the kitchen cabinet and all kinds of structural elements. Draw borders for future holes. Previously, it is necessary to fix the template on the countertop using adhesive tape - so the borders are more accurate. If there is no template in the kit, make it yourself on cardboard. To do this, transfer the dimensions of the bowl to the paper.
Important! Experts recommend a minimum spacing of 5 centimeters from the front edge of the countertop and the wall, and the most optimal one is 10 centimeters from the edge of the countertop and 15 centimeters from the wall. This ensures a comfortable washing of dishes and products, you can easily clean the area behind the bowl against the wall.
- Make the second border inside the first - it should recede by 1-1.5 centimeters. On this line it will be necessary to cut the countertop with a jigsaw.
- Carefully and slowly cut the hole with a jigsaw. It is best to pre-glue the saw cut place with masking tape - this will prevent the appearance of chips.
- Next, it is worth cleaning the place of saw cut from dust and sanding with sandpaper. Treat it with sealant and allow to dry - this will protect the ends from excess moisture.
- Pre-install the sink in order to make sure that the hole is cut out correctly, the sink fits snugly against the countertop. We check the convenience of connecting all communications.
- Next, raise the sink and fix it on a special double-sided tape that comes with the kit. If it is not, then we apply silicone sealant to the place of abutment of the sides of the sink to the countertop. We fix and press the product for 1 minute. This is how the installation of the kitchen sink itself takes place. As you can see, having done high-quality preparatory work, the installation process itself is quite simple and quick.
- Remove excess sealant or tape.
- Using the special fasteners that come with the kit, pull the sink to the worktop from the inside.
Important! In this case, it is important not to overdo it and not tighten the fasteners too much so as not to deform the bowl. If such fasteners are not provided in the configuration, you can purchase them in a construction or specialized store.
- Now you need to connect the hoses of hot and cold water from the kit to the water supply system. Do not forget to use rubber gaskets at the joints - this will extend the life of the system without leaks. Using a siphon and pipe, connect the bowl to the sewer. If the sewer drain outlet differs in diameter with the drain pipe that comes with the kit, you must purchase a special adapter in the plumbing department of the store.
- After complete installation, check the entire system for leaks. Use hot and cold water, check how the drain and overflow work.
If all the work is done efficiently, you can enjoy the sink for washing dishes and be proud that you did it yourself, thereby saving money on its installation.
to contents ↑Mounting the sink
This installation method is the simplest, and overhead kitchen sinks are the most affordable. Most often, the owners who make repairs in the apartment with their own efforts, choose this particular installation method. It does not require additional skills. The panel with the cup is simply mounted on a pedestal without a top and fixed in a certain way.
If you have to install a sink in the kitchen overhead, then you should adhere to the following stages:
- Purchase and make sure that your panel with the cup matches the dimensions of the kitchen cabinet under it.
- Apply silicone sealant to the upper ends of the cabinet and simply place a bowl on it. Press until completely dry. After that, the sink will be firmly fixed. The sealant in this case serves as an adhesive that fixes the product and, at the same time, protects the joints from moisture.
Important! If the overhead sink is mounted according to the sliding principle, it is simply placed on the pedestal and pushed against the wall. The panel with the bowl is included in specially prepared grooves in the cabinet and thereby is securely fixed. But this method is used quite rarely.
- At this stage, experts advise to further fix the structure using special mounting clips. They are attached from the inside to the sides of the kitchen cabinet, after installing the sink, the fasteners are clamped with self-tapping screws. As a result, the inner sides of the sink are pressed against the walls of the cabinet.
- After installing the sink, connect all communications and check for leaks.
Stock footage
As you can see, there is nothing complicated in installing kitchen sinks yourself. If you wish, you can do this on your own, thereby saving money for the family budget. Now you know how to assemble a sink in the kitchen, install, connect communications. Any skilled owner knows how pleasant it is to do such work yourself, because you can be calm and confident in the quality of the work done.
- How to choose a vacuum cleaner taking into account the characteristics of the house and coatings?
- What to look for when choosing a water delivery
- How to quickly create comfort at home - tips for housewives
- How to choose the perfect TV - useful tips
- What to look for when choosing blinds
- What should be running shoes?
- What useful things can you buy in a hardware store
- Iphone 11 pro max review
- Than iPhone is better than Android smartphones
 (No ratings yet)