

Do-it-yourself potholders of patchwork - patterns
A tack is a necessary thing that every housewife in the kitchen should have. It can be both a decorative element, and quite a faithful assistant. With the help of such a device, you can take a hot pot and not get burned at the same time. A potholder and other beautiful small crafts in the form of potholders can be bought or sewn yourself. That is what we will do today. We will share with you the main ways of tailoring an auxiliary product in the kitchen using the patchwork technique. For work, you will spend only a few threads and very little time, and the rest of the material is pieces of fabric that can be found in every home. Stay with us to learn how for beginners to sew tacks from shreds with their own hands - the patterns will be very simple.
to contents ↑Patchwork - what is it?
So, if you did not know, then we will tell you that patchwork is a technique of connecting different pieces of fabric together in a certain order. By combining various shapes, you can create a variety of patterns - from simple to the most complex.
A variation of the patchwork is quilling, which involves the creation of appliqués, embroidery and stitches. Such creative tack can easily be used as a gift for a person close to you. Let’s take a look at a step-by-step master class on making simple DIY patchwork gloves.
Preparation of materials
Before sewing, you need to prepare materials and tools:
- Shreds of old or new fabric of different shapes and sizes.
- Threads.
- Scissors.
- Sewing machine.
Important! No matter which fabric you use, old or new. In any case, it must first be washed, dried and ironed. This is necessary so that the material shrinks when washing. Otherwise, the finished product can deform strongly and completely change its shape. This rule applies to the case when you plan to combine old and new shreds of material.
Style selection
The next stage is the choice of the motive (pattern) of the tack from the scraps with your own hands. It can be made absolutely in different variations:
- In the style of patchwork.
- With embroidery.
- With applique elements.
Important! The above styles can be safely combined with each other - do not be afraid to experiment! The easiest option is to make a patchwork tack. Therefore, you need to master the simplest sewing, and then take up the creation of more complex quilling compositions.
Application can be:
- Flat.
- Volumetric.
Important! Volume sewing looks very impressive. It is not difficult to do this - you need to put a synthetic winterizer or holofiber under previously sewn shreds of fabric.

Tack schemes
Of course, ready-made patterns can also be searched on the Internet, but not all of them are suitable for sewing tacks using the patchwork technique. Let's look at the most suitable schemes:
- Squares.
- House.
- Vortex.
- Hourglass.
- Carousel.
- Mill.
- Ohio Star
- Solomon's Star.
to contents ↑Important! Most often, skilled needlewomen sew a tack from squares, and complement the product with the above patterns. Such a patchwork method will allow to achieve even greater effect from the work done.
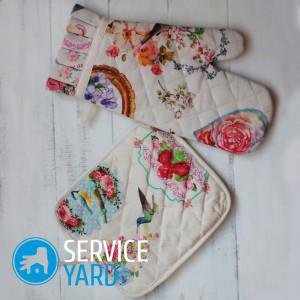
How to sew a tack from shreds? Step by step with photo
We especially want to note that in the patchwork style only the front part of a fabric product is stitched. The back side is sewn of plain material.
The tack scheme consists of the following elements:
- Hand made of shreds.
- The sides of the “mittens” are made of the same fabric color.
- Dense lining or insulation.
This is how the work goes:
- We make a pattern in the form of the most common mittens.
- After that, we sew the front part of the product in the style of patchwork. If we use a patchwork technique of sewing with squares, then first we sew a fabric base, and then we cut out small details from it on a pattern.
- Now we cut out the back, gasket elements and internal insulation.
- We assemble the product last. First, we sweep between ourselves such pattern elements: the front part, the gasket and the inner filler. After that, we sew the two sides obtained between each other as they would sew a mitt.
- We turn the product, process the edges and sew the loop from the used material.
A very quick and easy do-it-yourself tack is ready!
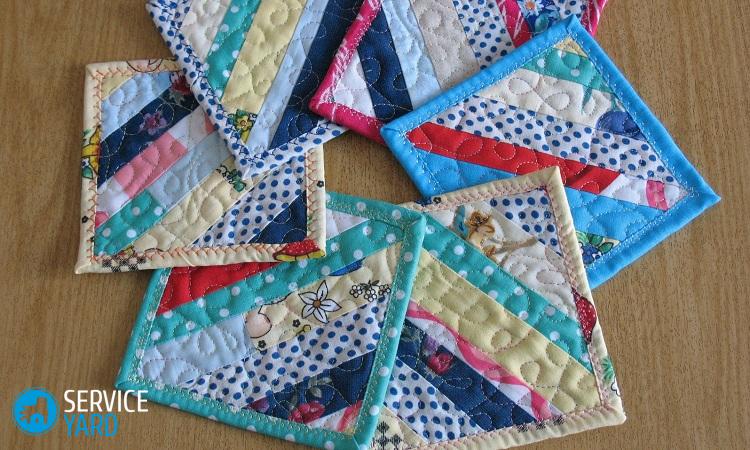
to contents ↑Do-it-yourself square patchwork tacks for beginners
As we said earlier, patchwork is ideal for creating square compositions.
Important! It is advisable that the color of the tack is in harmony with the external style of the kitchen. For example, if the kitchen is dominated by gray or white, then you can make a potholder in beige colors. Of course, you can use a brighter version, which must be added with a no less vivid picture, a vase or a curtain.
What we need to prepare:
- 2 shreds of linen plain fabric measuring 24x24 cm.
- 24 strips of linen fabric of different colors measuring 24x2.5 cm.
- 2 cuts of synthetic winterizer or batting 24x24 cm in size.
- Border (one color with the main fabric).
- Needle.
- Threads.
- Scissors.
- Pins for chipping.
- Sewing machine.
Important! The rim can be made with your own hands: cut strips of plain fabric (whose width is 6 cm), sew them together on the shortest side. After obtaining the required length, iron the seams with an iron, and then fold the fabric in half and iron the border.
Now we create further:
- Sew on strips. We put under the cotton batting (for any insulation) the usual linen fabric (2 squares with a size of 24x24). From above we impose multi-colored stripes and sew them with batting.
- We take two tissue cuts in our hands, fold them face to face in the central part of the seal. We sew them on the one hand, without affecting the second. Bend the top strip and iron the seam.
- We take the second cut and put it face down on the previously made strip. Again we sew the stripes along the edge, again iron the seam. Performing such manipulations, we sew the following patches until the entire surface of the batting is covered.
Important! Stitch each piece of fabric with a zigzag seam.
- Sew on the border. We put it on the wrong side of the product that we previously sewed from fabric shreds.
- Check the connection of the raw edge of the tack with the raw edge of the rim.
- Sew on the border, starting from the corner to one side of the tack. We bend it at an angle of 45 ° before each new tack angle. So we sew the border around the entire perimeter of the product.
- We return to the corner from which we began to sew, we again bend the border to the front side. This step must be taken before you sew the last edge of the border, not reaching the corner.
- Cut off the excess part of the border, leaving 10 cm to create a loop.
- We press the border to the front side (where the shreds) of the square, and after that we pin it with pins to fix it on the fabric.
- From the left edge of the border we make a loop, put it inside the border.
- Sew the border to the front side of the tack, closing all 4 open slices of the square.
Heart-shaped tack
For the manufacture of such a product, we need such materials:
- Batting or synthetic winterizer.
- Cotton fabric of the same or different color.
- Oblique trim or lace.
- Paper.
- Threads.
- Needle.
- Scissors.
- Sewing machine.
Step-by-step instruction:
- First we create patterns for tacking. On paper we draw a heart and divide it in half. The length of one central half should be 21 cm, the second - 18 cm. A large part will be the main part of the product, which we will cut with a bend. The second part of the heart is the upper part, where the hand will be inserted. All of the above options can be reduced to the desired size.
- We cut out two parts from cotton fabric according to the largest pattern and one part (the same size) from synthetic winterizer.
- Add 3 hearts together (seal in the middle) and align the edges of the fabric. Here we cut out 4 details on the second part of the pattern of the heart, which is smaller.
- We divide 4 parts into pairs, treating the edge with an oblique trim or lace.
- The resulting sides are placed on top of the big heart, align and sheathe the edges around the entire perimeter of the product. This can be done with ordinary machine stitching, zigzag or manually. We begin to sheathe from the middle of the top of the heart and in the same place we finish the work.
- We turn the edges of the inline in order to connect and close the slices of all the parts.
DIY quilting potholders using quilling technique
To do this, you need to practice first on lighter shreds. If you are skilled in patchwork, then you can start creating a more complex composition in the style of quilling.
What we need to prepare:
- Small patches of fabric in different colors.
- A synthetic winterizer or thermal pad (with an inner layer of foil).
- Paper.
- Pencil.
- Ruler.
- Threads.
- Needle.
- Tailor pins.
- Scissors.
We begin to sew a tack from shreds with our own hands:
- We prepare templates. We draw on paper and cut out 19 hexagons of the desired size of the future product. We took a hexagon, the size of which is 5 cm, with sides - 2.5 cm. Cut another hexagon with a seam allowance of 1 cm on each side of the figure. We will take it for a pattern, according to which we cut out the next 19 hexagons.
- We put the smallest sample inside out of the cut part, fix it with pins.
- We wrap the edges of the fabric on the template, sew all the sewn with stitch stitches. We are doing the same work with the rest of the details.
- Fold the two parts with their faces to each other, sew over the edge with ordinary stitches. We continue to sew parts together. We have to gradually form a flower.
- We iron out all previously done work, turn out the basting and remove all the templates from paper.
- Cut two fabric squares for the front and back of the tack. The exact same square is cut out for the synthetic winterizer.
- We begin to assemble the tack. We add all the layers in the following order: back, synthetic winterizer, front side, flower. Pins off all layers.
- Now we quilted the entire product, that is, the machine line should go through all the details, while flashing the flower using the quilling technique. If you do not have a machine, then do it manually using small stitches “forward needle”. It is advisable to perform this stage with bright and contrasting threads, having processed the edges of each hexagon.
- Cut a fabric strip 5 cm wide and a length that should be 15 cm larger than the perimeter of the heart. We wrap both sides of the strip on the inside.
- We surround our tack, sewing on a strip of fabric, using the same “needle forward” stitch.
- Having reached the corner, we wrap a strip, continue to lay a line on the other side of the product. We start the edging from the place where we plan to fix the loop for our kitchen mittens.
- After finishing the processing, we direct up a strip of fabric. We continue to make stitches, we form a loop for a tack. We wrap a strip on the wrong side of the product, and then sew it.
Well, the quilling-style kitchen mitten is ready!
to contents ↑Stock footage
Agree, it’s not difficult to sew patchwork potholders with your own hands. The only single case is a thermo-mitt made using sophisticated quilling technique. As you already understood, you need to start from the simplest in order to please your guests with a more complex handmade work. Creative inspiration and success in your work!
- How to choose a vacuum cleaner taking into account the characteristics of the house and coatings?
- What to look for when choosing a water delivery
- How to quickly create comfort at home - tips for housewives
- How to choose the perfect TV - useful tips
- What to look for when choosing blinds
- What should be running shoes?
- What useful things can you buy in a hardware store
- Iphone 11 pro max review
- Than iPhone is better than Android smartphones
 (No ratings yet)