

DIY Bonbon Blanket
Such an incomprehensible and unusual word, bonbon, means a variety of patchwork quilts made in a special “puff-shaped” technique. In order to make a bonbon air blanket with your own hands, you do not need to have special skills, however, you will have to study the instructions and work hard. But the result will be pleasing to the eye and warm with its warmth in cold weather. You will learn about all the nuances of manufacturing such original products from this article.
to contents ↑Material
Consider how to sew a bonbon blanket. The master class will provide useful tips and step-by-step instructions.
First you need to decide on the material. The best option would be scraps of fabric left over from sewing, or specially purchased cuts of the same quality, but of different colors.
It is better to give preference to such natural materials:
- satin;
- linen;
- poplin.
Important! The choice must be approached responsibly so that the product turns out to be of high quality, not pricked, easy to wash, does not fade, was convenient to use.
In the work you will need:
- material for the substrate;
- fabric for the front side;
- any filler - for example, synthetic winterizer, synthetic winterizer, batting or holofiber (cotton wool is not suitable for this case);
- strong threads of the same color with the fabric or contrasting with it - depends on what effect you want to get;
- sewing machine.
Cut
To sew a bonbon blanket, you must first cut it. For this:
- Determine what size we want to get the finished product.
- Divide the area of the figure into equal parts. For example, the planned size of 200x220 cm is divided into 42 squares measuring 10x10 cm.
- We cut the calculated number of squares for the substrate.
- We cut out the same number of squares, but of a larger size, for example 20x20cm. The height of the blanket depends on this.
Pattern
Using imagination, we form a pattern of cut squares or draw it on paper. We do this on the front side to understand how the finished product will look.
You can choose a chaotic, symmetrical arrangement, or even create a pattern. What creativity do-it-yourself rug bombs you get depends on your creativity.
to contents ↑Bonbon making
If you make a bonbon blanket with your own hands step by step, the next step will be the manufacture of bonbon. To do this, we need to sew the substrate and form bubbles:
- We connect the corners of the lining and the front part with the help of pins, while the fabric is placed with a pattern inside.
- On the front side, we make folds that can be arranged both randomly and symmetrically.
Important! It depends on what shape the bonbons will be: erratic folds will give originality, and symmetrical ones will look neat.
- We sew parts, leaving a few small holes in order to fill the product with filler and turn it on the front side.
- After stuffing, we sew the product.
- By analogy, we produce all parts.
- To form strips, we sew 10 elements in a row.
- We connect all the strips together.
- Sew the resulting fabric to a piece of fabric measuring 200x220 cm. If desired, a heater can be placed between them.
- On the wrong side, we sew the 3 edges of the blanket, leaving a hole for turning the product in 4 sides.
- After the product is turned out, we sew a hole.
Stock footage
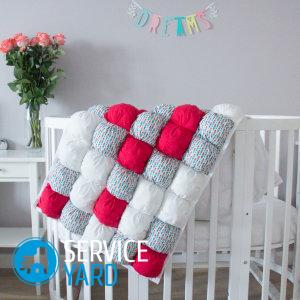
So we made a bonbon blanket with our own hands, which can be used as a decorative element or as a soft blanket.You can beat the finished product beautifully, for example, sew an elegant edging.
- How to choose a vacuum cleaner taking into account the characteristics of the house and coatings?
- What to look for when choosing a water delivery
- How to quickly create comfort at home - tips for housewives
- How to choose the perfect TV - useful tips
- What to look for when choosing blinds
- What should be running shoes?
- What useful things can you buy in a hardware store
- Iphone 11 pro max review
- Than iPhone is better than Android smartphones
 (No ratings yet)