

Do-it-yourself massage mat for children
On the feet are biologically active points that greatly affect the functions of various organs. When people constantly walked barefoot, the work of these points was stimulated by itself. But a modern person can rarely afford to walk without shoes, and even on an uneven surface, without risking injury or an unpleasant illness. Therefore, there is a need to periodically massage the feet with the help of special devices. The simplest thing is to make a massage rug for children with your own hands. This will be discussed in our article.
to contents ↑Why is it needed?
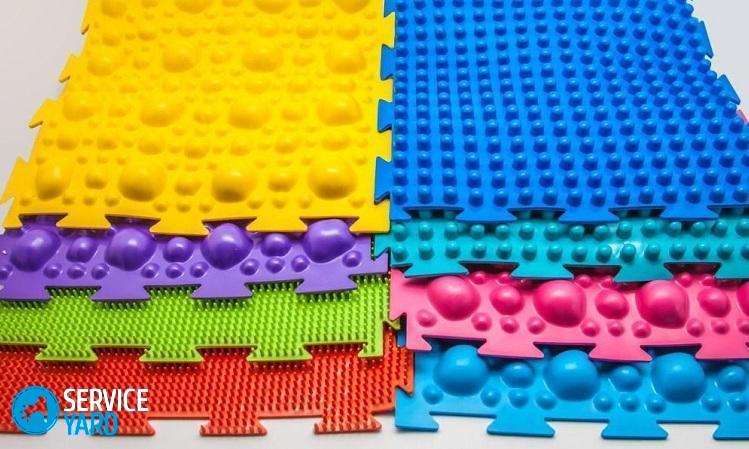
Is it really necessary to do a massage mat with your own hands? You can try to find something suitable in the store - for example, a plastic track with spikes and protrusions. But for a kid, such a product may seem too rude. And the assortment, frankly, is small.
A homemade rug has very specific functions:
- It stimulates biologically active points, and this does not require any effort.
- Artificial irregularities prevent the development of flat feet.
- Walking on stones contributes to the correct position of the musculoskeletal system in general and the arch of the foot in particular.
- Regular foot massage improves blood circulation and the work of the cardiovascular system, as well as activates the metabolism.
- Among other things, the child is more actively developing the vestibular apparatus.
- Any massage relieves psychological stress and allows you to relax, and for a child this is especially important.
In a word, a massage rug is a very useful thing. And if desired, it can be made so that the room will be decorated, and will contribute to the sensory development of your baby.
to contents ↑Defining tasks
Before you make a massage mat, think about whether your future creation will help to solve not just one, but several problems at once. For example, for sensory development the following are important:
- the shape of the rug and its individual elements;
- size that can be compared with the size of other items;
- the color of each piece.
Important! If you want every detail in your baby’s room to contribute to his mental and speech development, you can make a rug with elements in the form of figures of animals or insects.
The size
If you have already taken up such an extraordinary thing, then you probably want to make a massage mat with your own hands so that the baby enjoys using it for more than one day. A lot depends on the size. It is unlikely that the child will like to stand in one place and stomp on several buttons or sandbags. Therefore, the canvas should be of such a size that it was possible to run and jump on it, or even not alone, but with mom or a neighbor's baby.
There is no suitable piece of fabric? Nothing wrong. It can be made of several parts, and then sew them together. It will be even better - one part for a hard massage, the other for the middle, the third for the soft and gentle.
The form
That's where there is room for imagination! Do-it-yourself orthopedic rug can be:
- square;
- rectangular;
- round;
- oval;
- in the form of a house, leaf, flower.
to contents ↑Important! In a word, you can give the most bizarre shape to your product.The simplest and most popular option is a rectangle or even a long track. By the way, nothing prevents to make it the whole length of the room and lay it somewhere against the wall.
What to create from?
Materials to make a rug from flat feet for children with their own hands can be very different. The main thing is that the child does not get hurt and that what you make artificial bumps from does not harm his health. Fit for you:
- buttons
- stones
- caps for plastic bottles;
- cereals;
- beans;
- sponges for dishes;
- washcloths;
- tubes from felt-tip pens;
- wooden coasters for teapots and pans;
- curlers;
- curtain mounts;
- sinks;
- beads.
Important! Buttons need to be taken in different sizes. Pebbles are needed smooth, such as are somewhere on the seashore or river. You can take artificial soil for the aquarium.
The basis
Before you sew the mat under your feet yourself, take care of the base material. Finding something suitable is not difficult. You will find it useful:
- old bedspread;
- old jeans;
- piece of the palace;
- rubber mat;
- a piece of penofol or what tourists call foam;
- laminate.
Important! For some options, the base is not needed. For example, plastic corks do not need to be sewn or glued anywhere, they are just tightly fastened to each other.
Additional materials
And now you already have the foundation and the fact that you will attach to it. Now it remains to solve the question of exactly how to fix the buttons or pebbles:
- Elements are usually sewn onto the fabric, so you need a needle and strong threads.
- But on some materials it’s best to stick small parts. It is most convenient to use a glue gun with rods.
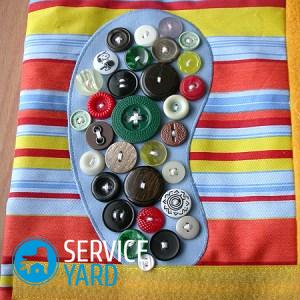
Do-it-yourself rug of buttons for children
For the manufacture of such a massage mat you need a lot of different buttons and a fair amount of patience. By the way, if you are looking for an answer to the question of how to make a massage mat for children with your own hands for a kindergarten, it is best to do just that, in the form of a track, and ask all the mothers and grandmothers to sew a dozen or two buttons. So things will go much faster. The ideal base material is long and narrow terry towels. They do not even need to be hemmed.
Operating procedure:
- Sew together 2-3 towels.
- Having retreated 2-3 cm from the corner, sew the first button.
- Sew the second button so that the distance is minimal.
- Sew all the buttons in rows.
Pebble rug
The basis of such a product consists of upper and lower blanks. As the bottom, which will be located on the side of the floor, you can use any dense material:
- felt;
- drape;
- cloth.
For the top fit:
- wool;
- dense satin;
- terry cloth;
- curtain or upholstery fabric.
Important! The material of the lower workpiece must not slide on the floor.
We fix the stones
The pebbles are located in separate cells, each of which will have to be flashed manually. They must be located fairly tightly. If the stones are not very large, you can leave spaces between them.
Here's how to get it all done:
- Mark the places for the pebbles on the felt or cloth.
- Glue the first element - it is most convenient to start from the middle.
- Lay the top blank.
- Sew the stone along the contour with a seam “back to the needle”.
- Glue the second pebble nearby, also sew a cell for it.
- Thus fill the entire mat.
to contents ↑Important! If the fabric from which the top is made falls off, you can sheathe the product around the perimeter of a double-folded braid.
Rug of cereals
This model of a massage mat is done in much the same way as a quilt or a down jacket. You can go in two ways:
- sew a rug from two layers, quilting them and fill them with groats;
- place the groats in separate bags, and only then sew them on the base.
Option 1
You will need a dense fabric, preferably plain weave. For example, linen canvas, calico or something else like that. Here's what to do with them:
- Cut 2 identical rectangles.
- Sew them around the perimeter, leaving one short side open.
- Mark the lines along which you will sew the product - parallel to the long and short sides.
- Make a machine line along the long lines.
- Gradually fill the compartments with large grains and, as they fill up, sew them on the machine or manually in short lines.
- Fill the last row of compartments, bend open edges inward and sew in a hole.
Important! Compartments do not need to be filled too much.
Option 2
For the base, you can take any dense fabric, and for the bags - canvas. If the base crumbles, hem it or sew it on all sides. Farther:
- Sew many pouches of different sizes.
- Turn the first bag to the front side.
- Fill it with cereal or beans.
- Sew on a typewriter or sew in the open edge manually.
- Fill the remaining bags in the same way.
- Sew them in rows on the base.
to contents ↑Important! Compartments can be filled with cereals with different fractions, as well as coarse and fine sand.
Do not throw the cork
An excellent massage mat is obtained from plastic corks from lemonade. True, there is one difficulty - there will be a lot of traffic jams. But then the rug can turn out to be very interesting, on it the baby will not only be happy to walk, but will also remember the colors. The most attractive thing is that you can use both the front and the wrong side of such a product.
You still need:
- awl;
- wide-eye needle;
- fishing line or durable thread.
Traffic jams can be fastened with any knots that you know. The main thing is that the fasteners are strong enough. For example, some patterns are suitable for making bead bracelets and belts. But first you need to make holes, for this:
- Turn the cork upside down.
- Pierce the side through the awl with an awl.
- Make the second hole in the side - it should be exactly opposite the first.
- Make a second pair of holes - the line segments that pass through these holes should be at right angles to each other.
We connect traffic jams
You can connect elements from the corner or from the center - it depends on the shape that you have chosen. If you are making a pattern from the center, the cork, which is in the middle, needs to be pierced in four more places so that the pieces of fishing line are at an angle of 45 ° to each other. Then we act like this:
- We pull the end of the line through two opposite holes in the cork.
- Again, we pull through the same two holes and in the same order - we get a loop. It should be located on the side where the thread is.
- We shift it from the end to the skein and attach the second cork according to the selected scheme, each time the fishing line must be pulled through the holes twice.
- Having filled the first row, we begin the next one - making a loop, we extend the fishing line on the back to the hole that is located on the future edge of the mat.
- Each element is now attached to the neighboring one and to the one in the previous row.
- After the last row is finished, make a good knot and hide it in the last stopper.
- You can melt the edge or seal the cork itself on the back so that the fishing line does not open.
Gym mat
Do-it-yourself gymnastics mat does not have to have pronounced bumps. On the contrary, it is better if it is even, but at the same time it must not be allowed to slide. There is no need to sew in this case. Such mats are made of polyvinyl chloride, which in hardware stores is often referred to as a “bath mat”. It remains to choose the right one - not rubber, but from synthetic material. As a rule, it is painted in blue, pink or white. The rest is simple. Mark the surface with a ballpoint pen and cut a piece of the desired size with a sharp knife.
to contents ↑Stock footage
Making massage mats is easy and fun. Your baby can also help you - he will surely enjoy watching how simple traffic jams and pebbles turn into something unusual.
- How to choose a vacuum cleaner taking into account the characteristics of the house and coatings?
- What to look for when choosing a water delivery
- How to quickly create comfort at home - tips for housewives
- How to choose the perfect TV - useful tips
- What to look for when choosing blinds
- What should be running shoes?
- What useful things can you buy in a hardware store
- Iphone 11 pro max review
- Than iPhone is better than Android smartphones
 (No ratings yet)