

DIY quilt - patterns
Bright, juicy, collected from colored shreds of the product, always attract attention, create warmth and comfort in the house. The technique that was used by our grandmothers, allows you to splash out creative imagination, improve your skills and create unique works. Things made in the patchwork style will decorate any interior and will appeal to both children and adults. For example, you can make a patchwork with your own hands, the schemes of which you will find in this article.
to contents ↑Style description
A product from multi-colored patches in other words is called a patchwork. Previously, such things were made for reasons of economy. However, over time, this technique has grown into a separate direction. This painstaking and exciting process deserves admiration and respect. Often you can find masterpieces from small pieces created by the hands of craftsmen.
to contents ↑Important! In the patchwork style, you can make blankets, blankets, pillows, napkins.
Materials and tools for work
If you decide to try your hand at this fascinating technique, stock up on the necessary materials in advance. Moreover, almost every housewife has them in the arsenal. Consider what applies here:
- Fabric for work will suit any texture. The main condition is the same thickness and density. You can use old trimmings, or you can buy special fabrics for patchwork in the store, which will provide the best result.
- Any sewing machine will do, there are no special requirements for it. The main thing is that she be in working condition.
- The spreader is better than scissors. It will allow you to highlight clear squares.
- Iron.
- Needles and pins in large quantities. Well, if these products are of high quality, you will have to use them more than once.
- Large and small sewing scissors are needed for large applications and small threads and details.
- Threads of different colors.
- A magnetic needle bar is not an obligatory but a desirable attribute. It will allow you to keep your needles and pins always in one place.
to contents ↑Important! If you are concerned about how to sew a quilt, you will need to purchase a filler. Usually, a synthetic winterizer plays its role, since it practically does not shrink after washing, so it does not need to be soaked before work. The disadvantages include the fact that it is synthetic, which is undesirable in the manufacture of children's bedding. An alternative is cotton or wool insulation.
Stages and technique
There are 3 main stages:
- Selection of scraps. Remove from your bins the rest of the material and sort them by color and texture. If there are none, buy it in a store - usually the material is very cheap in the leftovers.
- Create a sketch. You need to come up with or pick up the picture you want to get as a result of the work.
- Stitching The final stage, which results in a single piece of canvas. For the wrong side of the product, you will need a piece of fabric and a layer of padding polyester for filling a pillow or blanket.
The result of the work depends on your imagination, skills and material.
There are various techniques for stitching patches:
- watercolor is created by the selection of colors;
- fast squares - blocks of different colors are stitched;
- log cabin - a square in a spiral surrounded by stripes;
- magic triangles - triangular shreds are used in the work;
- strip to strip - is provided by stitching at different angles of fabric strips;
- checkerboard - puts the pieces in a checkerboard pattern;
- honeycombs - use hexagonal pieces in their work;
- Russian square - is made in the form of a multi-tiered pattern, in the center of which there is a quadrangle, and stripes and triangles along the edges.
A color scheme
The stylistics of the interior determines the color choice of the future product. If the canvas has a neutral background, it is better to combine contrasting colors. In this case, variegation will look moderate and look good. Before work, it is recommended to lay the patches on the main fabric, move a short distance and evaluate the result.
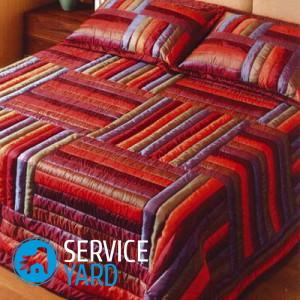
To create a beautiful bedspread from shreds with your own hands, it is permissible to choose no more than 6-7 colors, otherwise the product will look very colorful.
to contents ↑Important! Listening to the advice of experienced needlewomen, it is better to choose one primary color and choose other pieces that will be in harmony with it.
Patchwork cover - a master class for beginners
If you want to know how to create a do-it-yourself patchwork quilt for beginners, check out the following workshop:
- Decide on the scheme and prepare multi-colored squares of a certain size.
- Place the pieces on the surface according to the sketch.
- Connect the first two shreds with the front sides and sew them on the machine, making small allowances of 0.5 cm.
- Do the same with two more pairs of shreds.
- Connect 3 pairs. The result is a tape of 6 squares.
- By analogy, make another 11 such tapes, while do not forget to iron allowances.
- Connect any 2 strips with the front sides, pin them together and sew them together (allowance should be 1.5 cm).
- Similarly, connect the remaining strips and get a finished canvas.
- Take a synthetic winterizer, lay it on the wrong side of the finished canvas, sew at the seams that connect the squares.
- Connect the top with padding polyester and the bottom of the bedspread.
- Turn the patchwork part 1.5 cm and sew it with the bottom.
- As a result, we get the finished product in a single copy.
to contents ↑Important! If you do not know how to sew a plaid from shreds, follow the proposed algorithm, but without using a synthetic winterizer.
Patch quilt for newborn
If you want to decorate your child’s room with some unique little thing, you can make a children's quilt with your own hands - a master class will help you with this.
Important! A blanket intended for a child should be made only of natural materials. Images are better to choose for children: animals, cartoon characters, floral arrangements.
Algorithm for the production of blankets, size 82x103 cm:
- Cut out the appliqué that will be in the center.
- Prepare the rectangles for the perimeter of the product.
- Connect the middle of the fabric measuring 60x75 cm and a warm pad.
- Lock the layers by laying parallel lines.
- For the perimeter, sew 4 strips of rectangles.
- Iron the resulting sections.
- Sew the strips to the central part.
- Cut the lining larger than the top. This is necessary for the formation of the border.
- Cut out a small rhombus, attach an applique to it using pins.
- Sew all the details on a typewriter in a zigzag fashion.
- Sew the resulting rhombus with application to the center of the product.
Stock footage
Finished products will become the original decoration of any apartment. Over time, you will master this technique and will be able to create unique gizmos that will delight and create coziness.
- How to choose a vacuum cleaner taking into account the characteristics of the house and coatings?
- What to look for when choosing a water delivery
- How to quickly create comfort at home - tips for housewives
- How to choose the perfect TV - useful tips
- What to look for when choosing blinds
- What should be running shoes?
- What useful things can you buy in a hardware store
- Iphone 11 pro max review
- Than iPhone is better than Android smartphones
 (No ratings yet)