

DIY quilling paintings - schemes
Do-it-yourself crafts, postcards and paintings from quilling, whose patterns can be found in needlework magazines or on the Internet, do not cease to be popular among children and attract adult craftsmen. Behind the apparent simplicity in execution lies the complex painstaking process of creating a real masterpiece. In addition, many people involved in quilling are confident that the process itself captivates and calms the nervous system. So, creating beautiful crafts in this technique, you can combine business with pleasure. A postcard or picture made by yourself and presented to relatives and friends is of much greater value than just bought in a store. Let's look at a few simple ideas so you can do it yourself.
to contents ↑Tools that will be required in the work
In order to create crafts using the quilling technique, it is enough to buy colored paper and begin training. Although for this type of needlework, there are many different devices that facilitate the work of craftsmen. Later, you can buy those tools that will be convenient for you if you liked the process of making paintings and postcards in this technique:
- First of all, for quilling needlework you need paper. Today, special colored stripes are sold, equally cut. Although for starters you can take a simple sheet of paper and cut it into strips yourself.
Important! It is convenient to do this under the ruler with the help of an office knife - then the strips will be the same and even.
- Rod for twisting rolls. This tool has a bifurcated tip, which makes it possible to fix the edge of the strip, and then form a spiral with simple circular movements.
Important! To begin with, in order not to buy a special rod, you can use some kind of wooden stick or even a match forked on the tip.
- Adhesive for fixing paper. It is applied only to the tip of the strip to fasten the finished roll. Simple PVA does an excellent job of this task.
- Pattern with different holes. Such a template resembles a ruler for geometry, but inside it there are only circles of different diameters. This tool makes it possible to make the same spirals, if necessary when creating a quilling picture with your own hands.
- Tweezers, compasses, pencil - auxiliary tools that can be added to the process as you master the technique. Each needlewoman will choose for herself the necessary devices when she understands which of the tools greatly facilitate her task, and which of them can be replaced with improvised means.
Varieties of techniques and figures in quilling
At the heart of almost any of the quilling figures is a spiral, which is formed by twisting a paper strip. Depending on the length of the strip and the tightness of twisting, the circle can be of any size.
An ordinary spiral has many varieties and its derivatives. The main ones are:
- Drop - is done by pressing one side of the spiral with two fingers.
- The eye - roll is pressed with fingers from two sides, due to which the edges are extended to the sides, and inside there is a small round roll.
- A leaf - the edges of the roll are pressed as in the previous figure, however, this causes a slight displacement of the fingers in different directions, which makes it possible to make a curved shape.
- A month is very similar to a leaf, however, the two edges of the pressed roll bend only in one direction, and not different, because of which a crescent arc is formed.
- Arrow - one edge of the roll as if pressed inward, sharp tails remain on the sides, and the other edge is also sharpened.
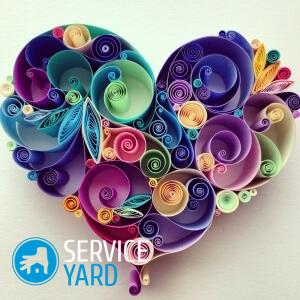
- Starting to twist the roll not from one but from two sides, forming two identical spirals, you can create horns, a heart and others.
to contents ↑Important! In quilling, there are many other figures that make it possible to create intricate patterns, patterns, and combinations of elements. Perhaps, in the process, you will be able to come up with some interesting figures of your own.
Quilling painting: basic instruction
To create any picture in the technique of quilling with your own hands, there is one basic instruction that should be followed:
- Before you begin, you need to decide on the topic. It can be a beautiful bouquet, landscape, image of elements of nature - birds, animals or humans.
Important! The choice will depend on personal preferences, as well as the goal of obtaining the final result.
- Having decided on the topics of the future crafts, you should stock up with the necessary tools for the work that we described above.
- Now you need to decide on the technique of creating the picture - classic, looped or contour.
- Prepare the required number of rolls for the job. Different methods and tools can be used for this.
Important! As a rule, the elements differ in shape, color and size, which makes it possible to make an original picture.
- After preparing all the elements, they should be glued to the base sheet, combining the details, focusing on your imagination.
- The finished picture needs to be framed, and you can enjoy the result of the work.
Picture from a bouquet of flowers
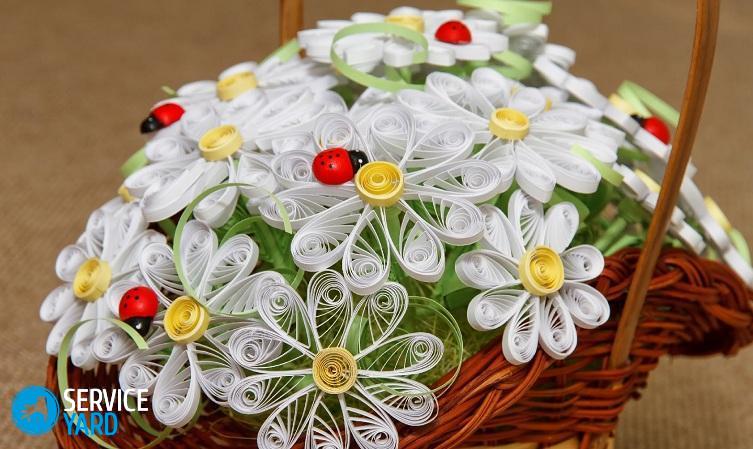
A do-it-yourself quilling picture with correctly selected colors and types of elements that it consists of looks quite realistic and incredibly beautiful. Panels with the image of flower bouquets can be especially delightful, and they can be different - from simple forget-me-nots and daisies to more complex works, for example, with lilacs, gerberas, peonies or asters.
Important! Sparkles, beads and other decorative elements can be used for additional decor.
Tools and materials for creating a picture:
- The basis for the panel - it can be glossy paper, starched or thick fabric, or just cardboard.
- Chopped quilling paper elements - the choice of color will depend on your personal preferences. In our case, light green, green, orange and pink shades are used.
- Stationery knife or scissors.
- PVA glue.
- Awl, orange stick or toothpick.
- Silicone glue.
- Decorative elements.
Sequencing:
- At the heart of our picture will be eleven large flowers, for each of which a middle should be made. To make it, you need to cut fringed paper in soft pink and green. Use a toothpick to tighten tight spirals. As a result, the middle should turn pink with green edges.
- The remaining segments, which are intended for flowers, should be twisted with an ordinary spiral, so that later it will be possible to give them the desired shape.
- Now you can start cooking the flowers themselves: squeeze the orange elements, giving them the shape of a leaf, glue 3 parts together at the very base.
- Give the pink spirals a droplet shape, two of which paste between the orange elements, and the remaining two on top of them. As a result, you will get a blank for the flower.
- Glue the required number of petals, each glue with orange paper to give them a finished look.
- Use a silicone glue gun to assemble flowers. Initially glue all the petals, and then fix the middle up.
- To make a bud, make a roll and extend it slightly until a cone is formed. Lubricate the middle with glue and attach the petals there.
- To make leaves, green spirals need to be shaped into an eye and glued together to form green branches.
- Assemble the composition by gluing all the details onto silicone glue, add decorative elements to make it more realistic and frame the panel.
New Year picture
On the eve of the New Year holidays, many people want to decorate their office, room or any other room with original crafts, which will help create a festive atmosphere, a sense of fairy tale and magic. You can make a New Year’s picture in the quilling technique with your own hands, using all the same materials described above, tools, namely:
- Quilling paper 0.5 cm green.
- PVA glue (as thick as possible).
- Scissors.
- Awl or toothpicks.
- Decor for decoration - shiny threads, beads, beads or small tinsel.
Sequencing:
- Before you start work, you should decide on the size of your future Christmas tree - the number of elements that will be used in the work will depend on this.
- Cut the paper with a fringe using small scissors.
- Using a toothpick, create tight spirals, securing their edges with PVA glue.
- Fluff the fringe.
- Stick the composition elements on the base, creating a Christmas tree.
- Decorate with decorative elements so that the Christmas tree becomes Christmas.
Stock footage
There are a lot of options for creating paintings from quilling with your own hands. You can come up with ideas yourself, or you can see them in magazines or on the net. In addition, the process of creating crafts in this technique is very interesting and entertaining, attracting children to it you can develop creative talent in them.
- How to choose a vacuum cleaner taking into account the characteristics of the house and coatings?
- What to look for when choosing a water delivery
- How to quickly create comfort at home - tips for housewives
- How to choose the perfect TV - useful tips
- What to look for when choosing blinds
- What should be running shoes?
- What useful things can you buy in a hardware store
- Iphone 11 pro max review
- Than iPhone is better than Android smartphones
 (No ratings yet)