

How to sew a children's backpack with your own hands - pattern
Nowadays, a backpack is necessary for absolutely every inhabitant of the planet. It is not surprising, because for a walk you need to take a lot of things, but it simply will not fit into your purse. Children's needs are no exception, because even for a regular walk we often take a lot of things. Our article will help you - here you will learn how to sew a children's backpack with your own hands. Pattern and review of the necessary materials, tools - everything will be considered as detailed as possible.
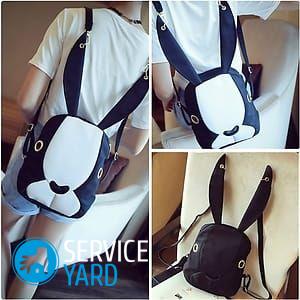
to contents ↑Cat backpack
In order to make such a useful and original accessory for your child, you need to stock up on the following items:
- Thick material in a pleasant color.
- The fabric to be used as the lining.
- A small piece of lace.
- Lightning.
- Buttons and colored threads for decoration.
Take a landscape sheet of plain paper. By the size of the product will be as follows:
- Width - 20 cm.
- Length - 30 cm.
Important! Sizes may be different. It all depends on how old your child is.
Patterns
Now you need to make a pattern of the basis of the backpack, the cat itself and the fish in its paws.
Next, you need to lay out the patterns on the fabric:
- Back - one piece of backing fabric and one lining each.
- The front part - the situation is the same (you need to cut along the line of the fastener).
- The upper straps are two parts, the dimensions of which are 7 by 43 cm.
- The lower straps are two parts, however, their dimensions will be 7 by 25 cm.
- 1 pocket measuring 17 by 13 cm.
- Fish - any size.
- Four paws - sizes are also determined according to your wishes.

Workshop master class
You can sew a backpack for a girl with your own hands with patterns in the following way:
- Sew paws of a cat. To do this, make notches, turn them out, and then put the synthetic winterizer inside the “bag”, then stitch or embroider the cat’s fingers.
- Sew the straps by twisting them and stitching them with decorative seams on the sides. Rivets are attached to the edges of the straps.
Important! It is necessary to flash one edge of each strap - this is necessary so that the fabric does not crumble.
- Checkout pocket. To do this, bend the edges of the prepared fish and sew it to the pocket with a zigzag seam. Further, the edges of the pocket are treated with the same seam.
- Decorate the top edge of the pocket. To do this, sew prepared lace to it.
- Embroider the cat’s legs on the pocket with which it holds the fish.
- Sew a pocket to the bottom of the front of the finished product, embroider the rest of the kitten's paws, not forgetting to pay special attention to the fingers.
- Go to the design of the muzzle - embroider his eyes and antennae.
- The zipper must be swept between the top and bottom of the front, then stitch it.
- Stitch the cat in advance prepared legs.
- Connect the front and back of the backpack with safety pins.
- Sew and notch in places where the seam is rounded.
- In order to finish it with your own hands, you need to make a lining. To do this, you need to sew it and leave 1 cm for the inside of the backpack pocket.
- Turn out the almost finished cat and insert the lining into it, then bend it and pin it to the zipper inside.
- Manually sew it to the clasp using a blind stitch.
- Next, on the upper straps, you need to make 3 loops, and on the lower straps sew on two decorative buttons.
The work is done.
to contents ↑Backpack for a boy with a typewriter
Before you start sewing such an accessory for your son, you need to come up with a detailed sketch where he and your wishes will be taken into account.
The process of making a backpack for a boy with his own hands is as follows:
- Making paper patterns. Measure the back of your child and figure it out on paper. Consider the option where the bottom is rounded and the top will narrow (there may also be tucks on it).
- Fold the fabric with the pattern down, circle the pattern obtained earlier.
- Circle and cut the workpiece, leaving 1 cm for allowances.
- Sew all the desired decorative elements.
- Seal with doubler - this is necessary in order for the product to become sloppy.
- Sew tucks.
Make 2 rectangles of size 7 by 4.5 cm. Fold in half with a pattern inward, stitch along the edge, then turn out and iron. As a result, you get 2 straps in order to secure the straps of the children's backpack with your own hands for the boy.
- Proceed to stitching the two main parts of the backpack - measure the identical distance from the top of the bag to the strap and pin it with safety pins. It is necessary to connect both parts in such a way that the tucks turn out to be one continuous, then make seams.
Important! Stitch everything together with the straps.
- It is imperative to treat the top of the backpack with an overlock or zigzag.
- Bend and sweep the top.
- Cut rectangles of size 25 by 7 cm (2 pieces), process their edges.
- Fold in half up face up, process the bottom.
- Baste, and then sew the strips to an almost finished accessory.
- To complete the work, it remains to attach the harness. Their length is calculated from the growth of your child, the width is 5-6 cm.
- Sew rectangles around the edge, turn them inside out, iron.
- Cram the edges of the harness inward and stitch along the edge.
- Pass the finished straps in a circle, then tie the ends into knots.
A children's backpack for a boy from 2 years old is ready.
to contents ↑Denim backpack for girls
Denim accessories are very original and practical, and children's backpacks are no exception. It is also worth noting that a hand-sewn backpack will always be original and unique.
You can sew such an accessory by following the algorithm below:
- Prepare the two lower parts of the jeans leg.
- Align their top.
- Spread the legs and smooth.
- Align the resulting fabric so that the seam is in the center. The excess must be cut so that the width is 35 cm and the length is 32 cm.
- Take the finishing fabric and threads that fit this fabric.
- Decorate the front of the accessory with decorative stitches as desired.
- Connect the two canvases with the front side inward, leaving a hole to stretch the cord into it.
Important! For pens of an almost stitched children's backpack for a girl, it is better to take a thick cord 4 m long (the color depends on the design of the accessory).
- Take the fabric for decoration and cut out strips 14 by 37 cm. Turn the edges, stitch, fold the strips in half.
- Stitch decoration material up to the accessory.
- Insert the cord.
- Fasten the cord at the bottom of the backpack, thread into the hole, secure from the inside.
The backpack is ready!
to contents ↑Backpack "Nyusha"
This section will describe in detail how to sew a children's toy backpack.
For further work, you need to stock up on the following materials:
- Fleece of white color and three tones of pink.
- Calico
- A piece of any black material.
- Foamed polyethylene - this is necessary in order for the accessory to keep its shape (such material can be found in stores for construction).
- Two meter belt.
- Belt adjusters - 2 pieces.
- Castle.
- Hollofiber - needed in order to stuff pens and legs.
- Sharp scissors.
- Threads matching color.
- Sewing machine.
In order to sew a children's backpack for a girl, you must perform the following steps:
- Cut out the handles, legs and face of the cartoon character, print it on the printer.
- Draw a circle with a diameter of 25 cm, make two pieces of the lightest shade of pink fleece, leaving 1 cm for allowances.
- Cut the same circles from polyethylene and calico.
- Start making parts for the noses. The eyes are best made from white fleece, the eyelids and hair are made from dark pink, and the nose and hearts are made from medium shade. No allowances should be left.
Important! It is better to draw all the details in advance with chalk - this is necessary so that all the parts are located evenly.
- Cut pupils out of a piece of black cloth.
- Connect circles of all materials.
Important! A synthetic winterizer can be placed between the fleece and polyethylene so that the eyes and nose of Nyusha are voluminous.
- Sew the two parts of the backpack on the right.
- Sew a muzzle to Nyusha. All details are sewn in a zigzag - it is better to start with the eyes, then continue with the nose and hearts.
Important! When sewing eyelids and hair, it is better to use dark pink threads, and pupils - black.
- Embroider shine on the pupils, mouth, eyelashes and nostrils with zigzag stitches so that the picture on the sewn children's backpack for the girl is better visible.
- Cut a strip of 54 by 6 cm from three materials, where the fleece is light pink. Leave 1 cm allowances.
- Connect the strips together, stitch them around the edge with a sewing machine. Optionally, you can cut out the continuation of the hearts and sew them with a zigzag seam.
- Make two strips of 26 by 2.5 cm from the darkest shade of the fleece, as well as polyethylene and calico, leaving allowances for the seams.
- Sew them together around the edge.
- Sew the lock to the stitched strips.
- Cut out the legs, handles, ears and Nyusha pigtail, then sew and twist them.
- Fill the character’s arms and legs using holofiber.
- Sew these details to the backpack.
- Prepare the straps for the backpack. In the regulator you need to insert a belt tape, cut it for a loop.
Important! The edges of harnesses can be bent on a typewriter, or cauterized with fire - this is necessary so that they do not open.
- Sew previously prepared strips to the circle where the “face” of the backpack is.
- Fix the straps on the back side of the accessory, sew this part to the strip.
Important! If desired, a lining can be sewn inside the accessory.
- Turn out “Nyusha”.
A gift for your baby is ready!
to contents ↑Stock footage
From this article you have learned many ways to please yourself and your child by making him an interesting gift. Create and enjoy your work so that the result makes you happy!
- How to choose a vacuum cleaner taking into account the characteristics of the house and coatings?
- What to look for when choosing a water delivery
- How to quickly create comfort at home - tips for housewives
- How to choose the perfect TV - useful tips
- What to look for when choosing blinds
- What should be running shoes?
- What useful things can you buy in a hardware store
- Iphone 11 pro max review
- Than iPhone is better than Android smartphones
 (No ratings yet)