

How to make a bottle stopper with your own hands?

Glass containers, unlike plastic bottles, are suitable for reuse. For example, a beautiful wine bottle in which you can store home-made wine will not only preserve the taste of your drink, but also on the festive table will be more appropriate. Very often, factory bottles are closed with a cork stopper, which does not work to close the neck again - it usually becomes several times larger than the neck of the bottle. Even if you cut the cork with a knife, the initial tight closing of the bottle cannot be achieved, moreover, the cork stopper is not too durable. And if we are talking about a 10-liter bottle, then no old cork is suitable at all. In the recent past, our grandmothers closed bottles of corn on the cob. Agree during technological progress to close the bottle in such a way at the same time and inconveniently. In our article we will tell you how to make a cork for a bottle of 20 liters with your own hands, so that it is beautiful, convenient and reliable.
to contents ↑DIY bottle stopper
Such a peculiar and useful craft can be done in several ways. Next, we will consider the most interesting of them.
Method number 1
How is the cork made? To make a cork for a ten-liter bottle, you need to prepare the following components in advance:
- Plastic 100-gram cup for molds;
- Starch;
- Silicone sealant.
Important! 3 caps come out of one package of silicone sealant.
Production Sequence:
- Pour ¾ of starch packaging onto a table with a slide, make a recess.
Important! To prevent silicone from sticking to the table, you can put glass on the surface.
- Using a professional silicone gun, we squeeze the silicone into the funnel from starch.
Important! The amount of silicone is the same as the size of our billet, namely a plastic cup.
- Then silicone and starch should be mixed until smooth. To prevent silicone from sticking to your hands, dip them in starch and start kneading the ingredients, like kneading dough.
Important! When mixing silicone, it is important to achieve such a consistency that the dough is not too stiff and does not have loose formations. Otherwise, the finished plug will let air through. Ideal for cork production, the mixture should resemble plasticine and not stick to your hands.
- The dough for the workpiece must be thoroughly mixed so that the silicone is completely saturated with starch, roll it well on the table and give a conical shape.
Important! The more starch the mixture contains, the stiffer the cork will be.
- Then sprinkle the prepared cork with starch a little so that it does not stick to the plastic cup and easily come out of it at the end of manufacture.
Important! To get rid of excess air, make small punctures on the bottom of the glass with a needle or awl.
- Next, we place the raw materials in a plastic cup, twisting movements tightly and evenly distribute the mass throughout the container.
Important! It is not necessary to use a blank in the form of a cup. If it is problematic to choose a blank for your bottle, roll the cork tightly with your hands, measure the diameter with a vernier caliper, and leave it to dry on a flat surface.
- In this form, leave the workpiece to dry for 3-4 hours. After time, we remove our cork from the workpiece.
Important! To speed up the drying process, after 30 minutes, place a container near a hot surface or place it near the battery.
- With a kitchen knife, you can trim all the bumps or reduce the diameter of the finished cork.
Important! Silicone sealant has a specific smell. To get rid of it, you need to place the finished cork first in hot water, then in cold water with the addition of soda for a while, or simply take the product to fresh air.
The cork is elastic and tightly closes the neck of the bottle. It is perfect for a 10 liter bottle for carving and bottles with tapered thread, they are also called "Cossack" bottles.
Important! For lovers of wine production in the cork, you should drill a hole so that air comes out of the bottle. To do this, the diameter of the hole should be slightly smaller than the drainage that you will use.
Method number 2
The following method is quite laborious and requires significantly more time for manufacturing than the previous one. But for those masters who like to tinker with the tool, you can use this option.
To make a cork for a bottle using the method that we will discuss later, you will need to prepare some auxiliary tool, namely:
- A can of peas or corn;
- Soldering iron;
- Gun for liquid silicone;
- Sandpaper;
- Building hair dryer;
- Liquid silicone.
Sequencing:
- At the first stage of manufacturing the cork, a mold should be made in which liquid silicone is poured. To do this, cut the top and bottom in a tin can, in the end - we get a cylindrical blank.
- Then cut the workpiece vertically to make a tin can of rectangular shape.
- Using a caliper, measure the diameter of the neck of the bottle, twist the tin to the desired size from the bottom, gradually expanding it upward.
- When one edge converges with the other, put the notches on top and bottom, connect the notches with an oblique line and cut with scissors.
- Carefully taper the workpiece with your hands, observing the size along the entire length of the workpiece.
- Expand your workpiece and grind the beveled and even edge of the tin with sandpaper.
- Connect the two slices end-to-end to each other, with a soldering iron, fix the workpiece in this position along the entire length. You get a cone shot glass without a bottom.
- Next, you need to solder the bottom. First, sand the bottom cut of the workpiece with sandpaper.
- Take one of the cut parts and solder the bottom with a soldering iron, trim the edges with scissors.
- Next, you need to solder the handle. For its manufacture, you can use a rigid wire or a metal tube.
- Grind the location of the handle and the edge of the wire for better adhesion of the material. The mold for casting the silicone cork is ready, now you can take on the manufacture of the cork itself.
- Take a building hair dryer and set the temperature to 120 degrees.
Important! A building hair dryer will serve to heat the mold so that the silicone does not freeze during filling and uniform distribution within the mold.
- After the mold has warmed up, use a glue gun to fill it with liquid silicone.
Important! The tin mold should always be kept above a stream of hot air.
- Once the silicone has been completely poured into the container, leave it to solidify.
- Finally, use a pair of pliers to bend the soldered edge and pull out the plug.
DIY bottle caps
You can quickly and without tools make an alternative to bottle caps.
Method number 1
To implement this version of the cork, you will need a plastic bottle with a cap corresponding to the diameter of the neck of the bottle.
Production Sequence:
- Put in a plastic bottle up to half the water, tightly close the lid.
- Turn and lower the bottle into the neck of the bottle.
- The device tightly and reliably closes the glass container.
Important! For winemakers, it is necessary to drill a through hole in the lid and bottom of the plastic “cork”, skip the hose and close the neck of the bottle with wine.

Method number 2
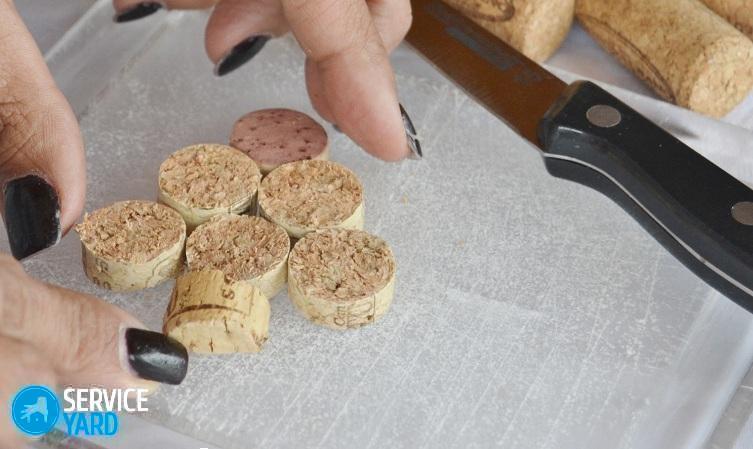
New creative corks can be made from old cork wine corks that do not fit the diameter of the neck. To do this, you will need:
- Kitchen knife;
- Cork stopper;
- PVA glue;
- Wooden spools of thread in different colors.
Preparation method:
- First of all, use a caliper to measure the diameter of the neck of the bottle.
- With a kitchen knife, carefully cut the stopper cone to the appropriate diameter.
- Lubricate the upper wide edge of the cork with PVA glue and glue the wooden spool with threads of different colors.
- Leave to dry completely.
Your creative corks are ready!
to contents ↑Stock footage
DIY bottle caps at home is a snap. To do this, just follow the instructions described in this article. With their help, you can make corks of different diameters to close large bottles, as well as make small decorative corks for bottles with your favorite drinks. As you can see, most of the items that are needed for this are in every home. Do not be afraid to experiment with decorating products. Then you will get more than just corks, the bottles will look beautiful and will additionally serve as decor elements in the room.
- How to choose a vacuum cleaner taking into account the characteristics of the house and coatings?
- What to look for when choosing a water delivery
- How to quickly create comfort at home - tips for housewives
- How to choose the perfect TV - useful tips
- What to look for when choosing blinds
- What should be running shoes?
- What useful things can you buy in a hardware store
- Iphone 11 pro max review
- Than iPhone is better than Android smartphones
 (No ratings yet)