

How to make a paper jacket?
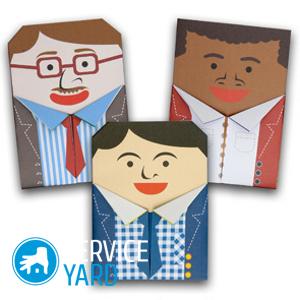
In this article, we will tell you how to make a paper jacket. Such decor is a great addition to a man’s card for any holiday: from February 23rd to his birthday and even new year’s. All you need is a couple of sheets of paper, cardboard, some free time and effort. So, we will consider several options for creating such crafts.
to contents ↑Method one
You will need:
- Cardboard or plain white A4 paper. The most important thing is that it be tight.
- Colored paper.
- Scissors.
- A simple pencil.
- Ruler.
- Felt-tip pens.
- Eraser.
- Satin ribbon.
- Glue gun.
- Buttons
How to act:
- Before you create a jacket out of paper with your own hands, you need to make a drawing. It will greatly facilitate the whole process.
- In the middle of the sheet, draw a rectangle with sides of 16 and 11 centimeters. On the sides of it are rectangles with parameters of 6 and 16 centimeters.
- Cut the resulting shape. Bend along the drawn lines. The upper part of the main rectangle should be slightly rounded with scissors.
- Thus, you should get something like a little book. Gently bend the edges - this will be the collar of our jacket.
- The next step is to create a shirt collar. To draw it, we make a drawing - draw a rectangle with sides of 14 and 4 centimeters. Cut it out.
- Draw a diagonal vertically and bend the figure along this line.
- After you need to bend the edges, giving the shape of a collar. We fasten it to our blank.
- Now we take half of the A4 sheet and fold it in half. On one of the inner sides we write poetry with congratulations, and then we glue the sheet inside the jacket - it will be a shirt.
That's all! Your postcard is almost ready - it’s all left to the decor:
- From a satin ribbon we knit a tie and glue it to the collar of the shirt.
- Fasten buttons and small pockets cut from paper onto a jacket.
Second way
To get started, prepare the items that you will need during the work. Among them:
- Album sheets or A4 white paper.
- Colored paper - in our case it is brown and red, but you can use any other colors of your choice.
- Scissors.
- Glue stick.
- A simple pencil.
- Threads.
- Thin satin ribbon.
Master class, how to create a card-jacket with a tie with your own hands:
- The first step is to write congratulation text on a sheet of A4 paper. Then roll it horizontally into the tube. Gently secure in the middle with a small and thin piece of tape.
- Now we begin to create a jacket. To do this, wrap the tube with brown paper, but leave a small place untouched (about ¼).
- From red paper we cut small triangles at an angle of ninety degrees and hold them tight on a jacket - this will be the collar.
Important! Also from red paper you need to cut small pockets, buttons and glue them to the jacket.
- The last moment is to tie a tie from the satin ribbon and attach it to our design.
Third way
The third idea of how to create a postcard in the form of a jacket with your own hands is somewhat more complicated than the previous ones. However, the result is quite interesting. If you do everything carefully, then such a present can be presented even to the boss.
The first thing, of course, is to prepare everything you need:
- White cardboard.
- Blue cardboard.
- A4 sheets.
- Colored paper in blue.
- Scissors.
- Glue stick.
Your actions:
- Our postcard will consist of three parts - shirts, vests and a jacket.
- We will start with a shirt.Take sheet A4, cut it into two parts horizontally. We only need one. Write your congratulations on it, then fold in half and gently fix it on the side with a small piece of adhesive tape.
- From a white cardboard cut a rectangle with sides of 2.5 and 10 centimeters. Bend it in a vertical line and slightly unscrew the edges, imitating a collar. Glue it to our “shirt”.
- Now it’s the turn of the vest. First, it is recommended to make a template, according to which already cut parts from blue cardboard. Glue the vest on the shirt. On top we sculpt buttons and pockets from a colored sheet of blue.
- We also cut out a tie from colored paper, glue its beginning at the collar and put it in a vest.
- The queue was left only for the jacket. Cut a rectangle in the shape of a shirt and wrap it. Above we imitate a collar. Cut a button from the same material, glue it.
- Postcard is ready.
to contents ↑Important! To prevent it from opening when it is not required, put on a small paper clip below. To make it invisible, its shade must be combined with the color scheme of the card itself.
Stock footage
That's all. We have offered you some ideas how to make a postcard jacket with your own hands. Rather, prepare everything you need, and go ahead - create a beautiful decor. As you can see, even children can handle it, so you do not have to have special skills to create such crafts.
- How to choose a vacuum cleaner taking into account the characteristics of the house and coatings?
- What to look for when choosing a water delivery
- How to quickly create comfort at home - tips for housewives
- How to choose the perfect TV - useful tips
- What to look for when choosing blinds
- What should be running shoes?
- What useful things can you buy in a hardware store
- Iphone 11 pro max review
- Than iPhone is better than Android smartphones
 (No ratings yet)