

How to make a flying saucer?
Do you like to make various crafts with your child, are you constantly looking for something new and interesting to interest the baby and bring him to work together? Then you will certainly like this article, because in it we will give several examples of how to make a flying saucer with our own hands. Your little son will not only take great pleasure in the process itself, but will also be happy to play space travelers with his new toy. In addition, with the help of such crafts, you can tell him about the structure of galaxies, stars and planets, as well as exciting space travel. The main plus of this craft is that it can be made from the simplest materials, and the baby will be able to come up with a spaceship shape, texture and color.
to contents ↑DIY flying saucer from improvised materials
In order for you to make an original flying saucer with your own hands, made with great interest and enthusiasm, you will need to take care in advance to prepare all the necessary materials. In the process of work, there will be no problems, because even a three-year-old child can cope with it, and parents will only have to complete all the gluing work.
Materials for work
To make a real spaceship, you will need such tools and materials:
- Waste disk.
- Two foam hemispheres.
- Colored paper with a self-adhesive strip.
- Decorative carnations.
- A few bamboo sticks or toothpicks.
- A couple of plastic flat stars.
- Acrylic paint.
- A few fairly large beads.
- Sequins.
- Chenille wire designed for crafts of silver or golden hue.
- Glue.

Operating procedure
If you follow this technology of work, then you will get the perfect flying saucer of paper with your own hands:
- Take a sheet of self-adhesive paper of the desired shade, circle the disc. Cut the circle along the resulting contour, glue it to the upper side of the disk.
- Paint one of the foam hemispheres with acrylic paint, leave to dry.
Important! Let the kid choose the color on his own, because thanks to this, independence and imagination will develop in him.
- Decorate the second hemisphere with decorative carnations and shiny sequins. To do this, string sequins sequentially on cloves and stick into the hemisphere.
Important! You can start decorating both from the edge and from the center, but it is better, of course, from the base, so that it is more convenient to form straight parallel rows. If your sequins are of different shades, then you can even make some kind of pattern from them, for example, waves, circles or stripes.
- After the top is decorated, you can proceed to the formation of the antenna. You need to stick two pieces of fluffy wire directly into the foam.
- Assembly of the ship's hull. It is necessary to stick hemispheres on both sides of the disk. In this case, a hemisphere with sequins should be attached to the shiny side, and a painted hemisphere should be attached to the side sealed with paper.
- We make the legs for the ship. It is necessary to string the beads on the edges of the toothpicks so that they enter them as deep as possible, but do not stick out from the opposite side.
Important! If the hole in the bead is too wide, then it can be sealed with plasticine, glue or chewing gum to prevent the beads from sliding on the toothpick.
- Insert the finished legs as supports into the painted lower part of the ship so that they are at the same distance from each other, otherwise the craft will not stand evenly.
- Glue plastic stars onto the shiny side. You can additionally cut out jewelry in the form of alien figures from paper.
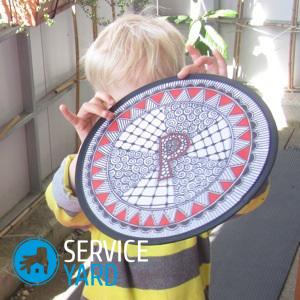
Our plate is ready!
Even a child can figure out how to make a flying saucer out of paper according to the presented scheme. If you do not rush and carefully examine each item, then the craft is guaranteed to turn out to be beautiful and quite durable.
to contents ↑DIY flying saucer made of natural materials
If you like to create compositions and all kinds of crafts from natural materials, in particular vegetables, branches and cones, then it will not be difficult for you to make a ship for aliens yourself, guided by this technique. Below we will describe in detail how to make a flying saucer with your own hands from the materials present in any modern kitchen.
Materials for work
You will come in handy to implement this idea:
- Oblong-shaped vegetables - it is better if it is squash, because it is most suitable for this purpose and it does not have to be cut.
- Colored push pins.
- A small plastic bottle.
- Colored paper or cardboard.
- Foil.
- Scissors.
- Transparent adhesive tape.
Master Class
Having prepared all the materials on the list, feel free to get started:
- Wrap the squash with foil - do it carefully so that there are no empty and empty areas. Use tape to secure the edges of the foil.
- Make portholes on the sides of the vegetable by attaching push pins - you need to place them around the circle.
- Cut off the neck of the bottle, leaving a little side walls so that the cabin of our spaceship comes out. The bottle can be inserted directly into the pulp of the vegetable or glued with tape.
- Decorative elements in the form of stripes and stars cut out of colored paper, stick on the walls of the ship.
- You can also make space travelers out of cardboard.
Stock footage
So our flying saucer is ready. With your own hands, the craftsmanship can be completed in just one hour, because if you involve a child in the process, he will have to explain something at certain times and give time to think and dream.
- How to choose a vacuum cleaner taking into account the characteristics of the house and coatings?
- What to look for when choosing a water delivery
- How to quickly create comfort at home - tips for housewives
- How to choose the perfect TV - useful tips
- What to look for when choosing blinds
- What should be running shoes?
- What useful things can you buy in a hardware store
- Iphone 11 pro max review
- Than iPhone is better than Android smartphones
 (No ratings yet)