

How to paint the ceiling?
Qualitatively painted ceiling will decorate any room. But instead of a flat, neat surface, self-staining often results in unaesthetic stains, splashes and smudges. This happens due to the fact that not everyone knows how to properly paint the ceiling. In fact, there is nothing particularly complicated in such work. It is only necessary to understand the technology of painting using a roller, taking into account some of the secrets of experienced painters.
to contents ↑Which is better - a roller or a brush?
The problem of choosing a tool for coloring is the very first stage of work. So what to choose for this purpose - a brush or a roller? Let's look at some of the features and benefits of each of these tools:
- If you have a large scope of work planned, then it is better to use a roller that will help to do all the work more quickly and efficiently, in comparison with a paint brush.
- Using a brush, you can paint over the joints, but working with this tool is much more difficult. You can work with the roller while standing in one place.
- Paint brushes do not require additional maintenance, while the rollers must be kept in a special container, thanks to which the tool will be protected from drying out and damage.
- Roller dyeing will be easier, because this tool (provided it is of good quality) does not leave a pile on the surface.
to contents ↑Important! In any case, choosing a tool in order to properly paint the ceiling, you should stock up with a pair of brushes with which you will paint over corners, joints, and other small objects.
How to choose the right tool?
Do not try to paint a large and even surface gently with a brush - only a high-quality roller will make it possible to succeed. Which roller is better to choose? When choosing a tool, you must pay attention to the following parameters:
- The length of the rod - it is most convenient to use a tool whose length is 25-40 cm.
- Fur coat material - it is better to choose a tool with a fleece coat. And the rougher the surface of the ceiling is treated, the longer the pile of the roller should be. This will help the emulsion to penetrate all bumps more qualitatively and evenly cover the surface.
Important! Velor and foam products are cheaper, however, they are unsuitable for such work. They absorb the paint too much, create a lot of spray and leave smudges, bubbles.
- Density - squeeze the roller by hand: if the shape remains the same, then the tool is of high quality. If it is deformed, then you will not be able to grind the emulsion well.
- Seam in a fur coat - a very rough seam will leave streaks on the painted surface.
- The strength of the pile - with a good tool, the pile remains in place, even if you pull it. If the fibers “climb”, then they will remain on the finished coating.
to contents ↑Important! It is advisable to choose a roller for painting the ceiling with a retractable, telescopic handle, or try to buy a special extension cord for the regular model. It is very inconvenient to paint the ceiling with water-based paint using a short-handle roller, even if you use a stepladder.
Learning to use the roller correctly
Having chosen a high-quality and convenient tool, you should also buy the remaining necessary things:
- Wide paint brush.
- Special plastic tray (cuvette, bath, trough).
- Masking tape.
Important! Painting the ceiling with a roller requires some skill. If you have not previously done this kind of work, then it is better to work out on some other surface. Try your hand at an unnecessary piece of drywall or on a section of the wall, which will later be glued with wallpaper.
Roller staining sequence:
- Pour paint into the tray.
- Dip a roller in it.
- Roll the tool along the ribbed side of the tray so that excess paint extrudes from the pile. If this is not done, then ugly smudges form on the ceiling.
Important! A well-rolled coat surface should be uniformly saturated with emulsion, without dry patches. If the paint is not removed from the roller itself, then you can help it with a brush.
- Attach an extension to the roller or, if provided, extend the telescopic handle.
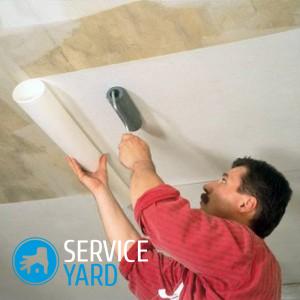
- Now you can start staining. Press the tool to the surface and move it along to and fro, carefully rubbing the emulsion so that smudges do not form.
to contents ↑Important! After completing work, thoroughly wash the tool. Only under this condition can it be reused. If you leave the paint roller for at least two hours, it will be damaged forever.
Ceiling painting - basic rules and procedures
Before you paint the ceiling with a water-based paint roller, it is necessary to prepare the surface:
- Clean the ceiling from the old coating.
- Putty potholes, cracks, seams.
- Align the frozen putty with a trowel and remove any dust that has formed.
- Paste the walls around the perimeter of the ceiling with masking tape.
- Prime the surface. This can be done with the same roller. However, do not use the same tool for painting and priming.
- After the primer has dried, you can start painting. Before painting the ceiling itself, it is necessary to paint all the corners, borders, stucco moldings and other hard-to-reach areas with a wide paint brush.
- Now paint the remaining surface with a roller.
Rules for painting the ceiling
In order to best paint the ceiling with a water-based paint roller, it is advisable to adhere to the following rules:
- It is better to work in the daytime and in high-quality lighting.
- You should start painting from the corner farthest from the entrance.
- Paint should be applied in parallel stripes, with an overlap of 8-10 cm.
- It is necessary to paint exclusively wet on wet, otherwise - noticeable joints may remain.
- Having finished applying the first layer of the emulsion, you need to take a break so that it is thoroughly dried. As a rule, the manufacturer indicates the exact drying time on the paint label.
- Each subsequent layer of the emulsion is applied perpendicular to the previous one. Thus, you get a uniformly painted surface.
Secrets of perfect staining from experienced craftsmen
To paint the ceiling well with a water-based paint roller, you can resort to small secrets that will help you achieve the desired result. Here are the key secrets to success:
- The final coat of paint is best applied in the direction of the window. Thus, light will fall along the streaks of paint, and the joints will not be noticeable.
- If you suddenly missed an unpainted area, then it is better not to try to paint the defect separately - you get a spotted area. Will have to cover the entire surface with another coat of paint.
- To timely notice poorly colored areas, you need to look at the ceiling from different angles. And even better - take an assistant who can see your work “from the side”.
- No need to save on primer.Without it, the paint will absorb too quickly into the surface, will not adhere well and will fly around very quickly.
- Try to paint fast. As a rule, applying one coat of paint to the surface of the ceiling in a room is 20-30 square meters. m takes up to half an hour. If you drag out time, the emulsion will begin to dry under your hands, stick to the pile, and everything will be ruined.
Stock footage
You probably already noticed that painting the ceiling with a roller is not the most difficult task. Armed with a high-quality tool, having bought good paint and using our recommendations, you are guaranteed success.
- How to choose a vacuum cleaner taking into account the characteristics of the house and coatings?
- What to look for when choosing a water delivery
- How to quickly create comfort at home - tips for housewives
- How to choose the perfect TV - useful tips
- What to look for when choosing blinds
- What should be running shoes?
- What useful things can you buy in a hardware store
- Iphone 11 pro max review
- Than iPhone is better than Android smartphones
 (No ratings yet)