

How to weave baubles from a floss?
Braided bracelets came to modern everyday culture from America. Since ancient times, the Indians gave each other such things, and they were considered a symbol of friendship. Then this tradition was adopted by the hippies, who carried it around the world. The symbolic meaning has ceased to play such a big role. Of course, even now people give each other similar accessories as a sign of friendship, but often a bracelet made of threads is simply a spectacular addition to clothes. How to weave baubles from a floss? You will learn about some features of this type of needlework from our article.
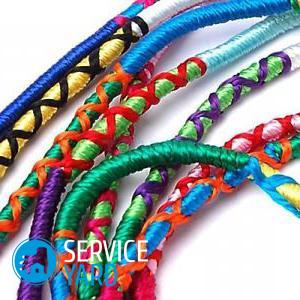
to contents ↑Materials
The Indians weaved their baubles literally from everything that was at hand. As material for bracelets were used:
- threads and ropes;
- skin stripes;
- stems and roots of plants.
For the weaving technique, which has become popular throughout the world, the best material is threads, and not any, but folded into skeins of several thin fibers. Such threads have existed for a very long time. These are cotton floss. Previously, they were used only for embroidery, but lovers of weaving also managed to appreciate them.
to contents ↑Important! You can also use cotton garus, folded in 2-3 layers of “iris” or “snowflake”. But the floss is better anyway.
Types of weaving
How to weave baubles from a floss? For beginners, it will be useful to find out that there are only two types of weaving:
- oblique;
- direct.
Slanting
Oblique weaving is also called mosaic. It is considered simpler, so it’s better to start with it. Without much effort, but armed with patience, you can get both plain bracelets, and with an exquisite geometric pattern.
Direct
Direct weaving is not that complicated, but it requires some experience. Having mastered it, you will receive not only the answer to the question of how to make baubles, but you will be able to create something larger, like a belt or a panel.
to contents ↑What else you need?
Before you make a bauble of thread, think about additional equipment. It is extremely simple. You need:
- scissors;
- large pin;
- jeans;
- table;
- Scotch.
Scissors, of course, are needed to cut skeins of the right length and trim the ends. Why the rest? Threads need to be attached to something. There are two options.
Option 1
Skeins are tied to a large pin (you can use a knitting pin, but in most cases a large English will do). Pin pins on jeans.
Option 2
Skeins of tape are glued to the table. But this can be considered an emergency option when there are no pins at hand. Scotch tape holds much worse than she does, so the threads can slip out - it is difficult to achieve even weaving.
to contents ↑Choose color
The assortment of threads is extremely large - you can find threads of literally all colors and shades that exist in nature. Therefore, before weaving bracelets from floss thread, select the colors. Most often, these little things are made as a gift, so you should take into account the tastes of the person for whom the jewelry is intended.
to contents ↑Important! For many people, colors and their combinations are symbolic. In weaving baubles almost all shades, except black, carry a positive mood.
Weaving baubles for beginners
Having examined the bracelet made of threads, you can easily make sure that it consists of double knots. There are only four ways to tie such knots:
- right straight;
- left straight;
- right corner;
- left corner.
It is better to choose schemes - there are a great many of them. Symbols are the same everywhere:
- The start of the arrow means the thread that runs the node.
- The tip of the arrow shows how the thread is positioned after the knot is made.

Primary node
Most often, the straight left knot is used, and it must be mastered first of all - many masters call it the main one.
Important! You can learn on two lines, for example, fold in half a small piece of skein and tie it to a pin.
How to weave baubles:
- Take the left thread, put on the right.
- Pull the right thread.
- With the left thread we make a knot, and then another one.
Important! The right straight knot is done in much the same way, only the right thread is superimposed on the left.
Corner nodes
After you learn how to confidently knit straight knots, you can go to the corner elements:
- Tie the first knot in the same way as the corresponding straight element.
- Pass the thread under tension.
- Tie a second knot.
Some general rules
It is useful for someone who is just starting to weave baubles from a mouline thread to know some features of the technology:
- There should be 2 threads of each color.
- Skeins are mirrored: if blue lies on the left edge, then on the right too, yellow is second on the left and second on the right and so on.
- You can start weaving from any direction.
- If you are weaving from left to right - use the left right angles, if on the right - vice versa.
Weave the first bauble
Having dealt with the nodes, try to start weaving baubles from the floss with your own hands. For the first bracelet you will need:
- 7 skein floss 100-120 cm long;
- scissors;
- thin knitting hook or needle (dissolve unsuccessful knots);
- pin, electrical tape or tape.
The very technology of weaving a simple bauble is as follows.
- We lay out the threads in the desired order (how the colors will alternate).
- Tie the ends of the skeins with a regular knot.
- Fix the workpiece in any convenient way (it is best to pin it with a pin to the pants).
- Start weaving with the two leftmost strands.
- The one that lies to the left (in the first node it is working), put on the one to the right of it - a loop is formed.
- Pass the tip of the working thread from the bottom up into this eyelet.
- Tighten the knot by pulling the work thread up.
- Now you have a second thread to your left, it has become working.
- Put it on the thread that is now on the right.
- Pass in a loop.
- Tighten - you get the first double knot.
- Tie all other threads with double knots with the same working thread - it should become the extreme right.
- Make the next row with the thread, which is now on the left edge.
- So weave until you get a strip of 18-20 cm long, consisting of double knots.
- Braid the remaining pieces of thread into pigtails.
- Fix it all in a knot.
- Untie the locking knot.
- From the edge where he was, braid the pigtails and also make a knot.
- Trim the ends.
to contents ↑Important! Weaving is necessary only in one direction - from left to right or from right to left.
Direct weaving
After you learn oblique weaving, you can go to the direct. It is a little more complicated and requires more attention.
Important! This type of weaving allows you to make bracelets with different patterns - geometric, floral and even with subject pictures.
It is better to start with threads of two colors: one for the background, the second for the nodes. The second thread should be much longer, because it runs all the nodes.
Important! The threads for the background can be folded in half - then the base will turn out more spectacular.
Operating procedure:
- Fasten the threads in the same way as for oblique weaving.
- Make the first row from left to right, as described in the previous method.
- Run the second row from right to left, the leading (it is working) thread will be the same all the time.
What are the schemes?
Having mastered the knots and tried your hand at three-color or two-color simple weaving, try to read the diagrams. They are of two types:
- full cycle;
- incomplete cycle.
The full cycle diagram depicts the repeating part of the pattern. That is, after you finish this segment, the drawing must be repeated again. The partial cycle diagram shows which colors are on top and which are on the bottom.
to contents ↑Decorate baubles
Braided bracelets and without any additions can be very beautiful. But they are also quite appropriate elements that are easy to attach:
- beads;
- beads;
- spikes;
- rhinestones;
- stones
- sequins.
Important! An unusual lock can also be a spectacular decoration, although advocates of the purity of the genre believe that the bracelet should be tied with a double knot, and nothing else.
Rhinestones
As for the rhinestone, then gluing them to the finished bracelet makes no sense, because:
- they come off very quickly;
- traces remain of them.
Important! It is best to buy threads on which small rhinestones are already fixed. Such a thread is placed along the entire length of the bracelet, in the center, and sewn with a thread floss of a suitable color in 1-2 additions.
Spikes
Spikes are placed not only on leather bracelets. They can well decorate a bauble. But first you need to do the markup. Such elements are fixed on the wrong side.
to contents ↑Stock footage
That's all the wisdom of such a fascinating needlework, with which you can create original jewelry for yourself and for a gift. Develop your creative taste by experimenting with schemes, colors, technologies, and be sure that such an activity is unlikely to bore you!
- How to choose a vacuum cleaner taking into account the characteristics of the house and coatings?
- What to look for when choosing a water delivery
- How to quickly create comfort at home - tips for housewives
- How to choose the perfect TV - useful tips
- What to look for when choosing blinds
- What should be running shoes?
- What useful things can you buy in a hardware store
- Iphone 11 pro max review
- Than iPhone is better than Android smartphones
 (No ratings yet)