

How to glue the wallpaper on the ceiling?
Everything has long been accustomed to the fact that the walls are glued with wallpaper. But paper or non-woven on the ceiling is a relatively new phenomenon. But many designers have already managed to appreciate the benefits of this type of finish and offer those who started repairs, a lot of interesting solutions. If you wish and some skills, you can design the upper part of your apartment yourself in a spectacular and unusual way. How to glue the wallpaper on the ceiling? This modern type of finishing work will be discussed in our article.
to contents ↑How to glue?
Before gluing ceiling wallpapers, carefully read the assortment of building stores. The fact is that far from all materials are suitable for decorating the ceiling. For instance:
- it is better to immediately abandon textiles - the fabric is too heavy, and weight plays a very big role in this story;
- the same can be said of most types of wooden cladding - it’s suitable, but you’ll have to fix it not with glue, but with something else.
You need to choose such a wallpaper to 1 square. m weighed no more than 110 g, but the density should be quite high. They may be:
- paper;
- vinyl;
- non-woven.
to contents ↑Important! Glass and liquid are also suitable, but in essence neither one nor the other is a wallpaper, so the technology of finishing work will be completely different from that used when decorating surfaces with vinyl or non-woven.
Paper
The advantages of this material are well known:
- passes air, allowing the surface to “breathe”;
- environmentally friendly;
- easy to handle;
- cheap.
An important point for the designer is a large assortment of this type of product from suppliers. Paper wallpapers vary in color and texture, so there is always the opportunity to choose something interesting, but rather budget.
Such wallpapers also have disadvantages, and very significant ones:
- poorly related to moisture;
- fade;
- do not last long.
If fast abrasion during the decoration of the ceiling does not play a big role, then the fact that the wallpaper fades can be extremely unpleasant.
Important! If you have already settled on paper wallpaper, choose those that are designed for painting - you can paint them many times.

What are paper wallpapers?
The answer to the question of whether it is possible to glue wallpaper on the ceiling is unambiguous - of course, it is, but you need to choose the right variety, even if it is paper. Wallpaper for painting, which are most often used for a similar purpose, are of two types:
- structural;
- coarse fibrous.
Structural
They are glued from several layers of embossed paper. As a rule, white sheets are used in production. This type of wallpaper is available in wide rolls, which also have a large length, so they are very suitable for gluing ceilings. The surface is flat, with virtually no joints. Structural wallpapers come in two varieties:
- two-layer;
- three-layer.
The former will be cheaper, but the latter will last longer, and gluing them, oddly enough, is easier.
Important! When gluing structural wallpaper, glue is applied not to paper, but to the ceiling.
Coarse fiber
This type of coating consists of two paper layers. A layer of wood sawdust, very well compressed, is laid between them. Such wallpapers are made of very thick paper. There is no picture, so nothing needs to be customized, and the surface has a beautiful grainy texture.But for the ceiling, this material can be too heavy.
to contents ↑Vinyl
Puzzled by how to glue the wallpaper on the ceiling, pay attention to such material as vinyl. The range of vinyl wallpapers is smaller than paper, they are more expensive, but this coating has a lot of other advantages, the main of which are:
- moisture resistance;
- strength:
- decorativeness.
Important! Unfortunately, not all varieties of vinyl wallpapers are suitable for gluing the ceiling. This material has a fairly large weight, so you need to choose very carefully.
They look more effective than paper ones and serve about twice as long. But vinyl wallpapers are also different. On sale you can meet:
- foamed vinyl;
- thick vinyl;
- silk screen printing.
Foamed vinyl
Wallpaper made of foamed vinyl is quite easy to distinguish. They have a pronounced relief and a spectacular texture. You can glue these even in the bathroom and in the kitchen - they are quite resistant to moisture and steam. They are easy to care for - any household detergents are suitable.
True, they also have a drawback - this material does not let air through, so it is not suitable for decoration:
- nursery;
- bedrooms;
- living room.
But nothing prevents sticking such, for example, in the hallway or in the toilet.
Important! If the room has poor ventilation, you can’t trim it with foam vinyl.
Heavy vinyl
This magnificent material, made using special heat treatment, does not react with the environment at all, does not absorb water or smell.
For the base, take two-layer paper or specially prepared fabric with a high content of natural fiber. Thick vinyl serves a wonderful long time. It is completely insensitive to sunlight, resistant to mechanical stress, and you can wash it with anything, even an iron brush.
There are several very important advantages:
- the material does not change size when glued;
- vinyl does not shrink when dried;
- does not shine through, respectively - well hides small flaws of the surface.
Silk screen printing
This type of vinyl also consists of two layers. The top layer is decorative, it is very similar to natural silk. On sale you can find both smooth varieties of this material, and relief.
Its advantages are the same as those of other vinyl wallpapers:
- does not fade;
- little abrasion;
- does not deteriorate when exposed to water;
- does not change size when wet;
- easily glued.
to contents ↑Important! Vinyl wallpapers can also be used for painting.
Non-woven
If you first thought about how to glue wallpaper on the ceiling, non-woven fabric is more suitable for this than other materials. Advantages of non-woven wallpaper:
- light weight;
- strength;
- resistance to mechanical damage;
- the ability to maintain shape and size when wet;
- decorativeness;
- environmental friendliness - they perfectly pass air and do not emit harmful substances.
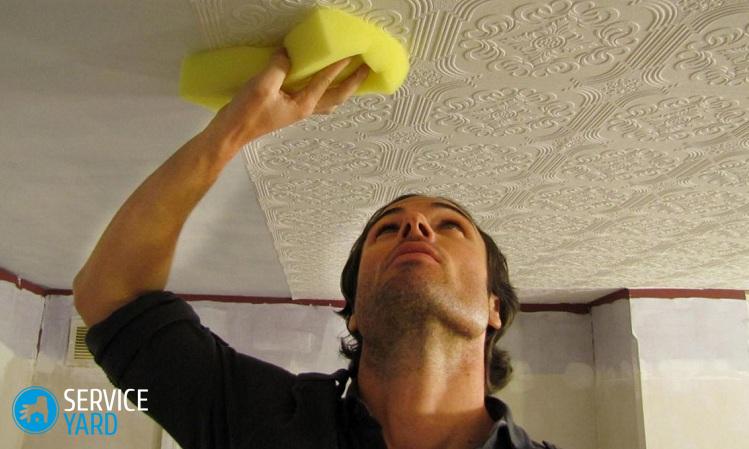
How to glue non-woven wallpaper on the ceiling? This can be done without an assistant. The ceiling is covered with glue, after which lightweight panels of this material are superimposed on it.
to contents ↑Important! Perhaps their only significant drawback is transparency. Therefore, if there are spots or cracks on the ceiling that cannot be eliminated, you need to apply good soil or stick a layer of light paper. Its main difference from paper and vinyl wallpapers is a non-woven base made of synthetic fibers and cellulose.
Features of working with different materials
Before you glue wallpaper on the ceiling with your own hands, consider some specific qualities of different types of materials:
- Vinyl strips must be positioned in the same way as they were on the roll.
- Each material has its own glue, so be sure to look at the markings.
- Flizelin before pasting is not necessary to cut.
- When working with paper and vinyl, glue is applied both to the ceiling and to the wallpaper, and when pasting with non-woven - only to the ceiling.
What you need?
Pasting the ceiling with wallpaper with your own hands - the process is not so complicated if you properly prepare for it. To get started, take care of the tools. You need:
- ladder;
- dishes for glue;
- glue brush or roller;
- roulette;
- soft rags;
- sharp knife;
- scissors;
- pencil or marker;
- plastic roller or spatula (smooth the surface).
In principle, instead of a stepladder, you can use a table if you can freely reach the ceiling from it. But it’s more convenient to move the stepladder.
to contents ↑Glue the wallpaper on the ceiling
The gluing process consists of several stages:
- surface preparation;
- wallpaper preparation;
- preparation of materials;
- gluing itself;
- smoothing.
Cooking the ceiling
Wallpapering is best done during the day, in natural light. And the point is not so much that in daylight, defects in work are better visible. It is simply necessary to observe safety precautions, that is, the first thing is to turn off the electricity in the apartment.
Farther:
- Take out furniture that can be removed from the room.
- Cover the remaining objects and floors with plastic wrap.
- Remove the old coating from the ceiling - you can leave only oil paint or water-based paint.
- Close up all the joints on the ceiling, if any.
- Wait for the solution to dry.
- Sand the sealed joints with sandpaper.
- If the windows face the sunny side, close the curtains.
- Prime the surface.
- Dry the ceiling and apply another layer of soil.
- Let the layer dry, cover the ceiling again with soil.
- After complete drying, outline the first line under the wallpaper.
Priming
The primer enhances the adhesion of wallpaper to the surface. Its appearance depends on the surface. For example:
- If paint remains on the ceiling, an acrylic-based primer is suitable.
- If you managed to clean the surface completely, you can prime it with wallpaper glue.
How to mark up?
When marking up, the question always arises of how to stick the panels - parallel to the windows or perpendicularly. The second option is preferable, since the joints will not be so noticeable. But if you live in a corner room with two windows on adjacent walls - you can glue as you like.
Very good if you have a laser level. Then you will draw the first marking line without any problems. But there is also a traditional option - lace and pencil:
- Measure the width of the roll.
- Subtract 2-3 cm from the result.
- Measure the distance obtained from one of the corners.
- Do the same on the opposite wall.
- Between the marks, pull the lace, securing it in any convenient way (for example, with tape).
- Draw a few tags along the lace.
Cooking glue
The strength of the connection surfaces largely depends on the glue, so that the process of its preparation should be taken very carefully. How to breed it is indicated in the instructions, and it must be fully implemented.
Usually the procedure looks like this:
- Pour as much water as indicated in the instructions into the container designed for glue.
- Pour a little dry mixture, mix well.
- Add the mixture, continuously mixing - this will allow you to get a homogeneous mass without lumps.
- Leave the glue on for 20-30 minutes to make it swell.
Important! Of the good adhesives, products of the following brands can be noted: “Cleo”, “Quelyd”, “Methylan”, “Moment”, “Pufas”. Read carefully on the packaging what type of coating this or that mixture is intended for.
Wallpaper Cutting
Vinyl and paper wallpapers are cut before gluing. It is important to correctly determine the length of the panel. Measure the length of the room, add 10-12 cm to allowances for it - the wallpaper should go onto the walls.
If the material is thick, then glue it without allowances, strictly at the joints.
Important! Strips for the entire ceiling should be prepared immediately. Wide wallpaper cut with a margin - the excess can be cut later.
Gluing
The gluing technology is not much different from that used for wall decoration:
- Apply glue to the ceiling - make it better with a roller so that the layer is even and without gaps.
- If necessary, apply glue to the wallpaper.
- Put a strip on the marks on the ceiling, press firmly.
- Smooth the cloth with a plastic roller or trowel.
- Use a soft cloth to remove excess glue.
- Gently brush the edges with a brush.
- Stick the next panel.
Important! If you do not have an assistant, you must work very quickly so that the glue does not have time to dry.
Some subtleties
There are two points to which special attention should be paid:
- pasting the place where the lamp will be;
- pasting corners.
Where there will be a lamp, make a few short cuts, and then carefully bend the wallpaper inward or cut it. As for the angles, the sequence will be as follows:
- Take the banner into the corner.
- Mark the corner in the allowances.
- Remove the strip and make cuts - you should get a cut out square.
- Stick the cloth, joining the cuts on the allowances.
Stock footage
Now you are convinced that gluing wallpaper on the ceiling is not as scary as it seemed initially. Therefore, you can well cope on your own, respectively - the result will also please you much more, because in the process of decorating your home you will literally invest a piece of your soul.
- How to choose a vacuum cleaner taking into account the characteristics of the house and coatings?
- What to look for when choosing a water delivery
- How to quickly create comfort at home - tips for housewives
- How to choose the perfect TV - useful tips
- What to look for when choosing blinds
- What should be running shoes?
- What useful things can you buy in a hardware store
- Iphone 11 pro max review
- Than iPhone is better than Android smartphones
 (No ratings yet)