

DIY bunk bed
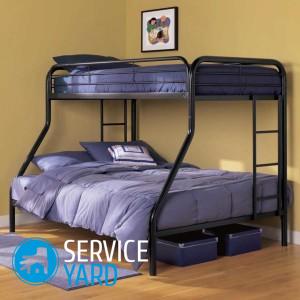
Many parents with two children are thinking about how to save space with a bed. A bunk bed will help you solve this problem. A children's room with such a two- or three-story bed is economical, comfortable and ergonomic. One of the advantages is that both girls and boys can be on a similar berth, resting on different tiers. Such a structure can be organized in an orderly way: draw drawers at the bottom, attach a side cabinet or desk to the side, add a slide to lower it, and much more. Your children will be delighted with such an interesting design. Do-it-yourself bunk bed is done in a few days, and the result will pleasantly surprise you. Having made such a bed yourself, you will save a lot on buying factory furniture. Let's begin to understand this issue.
to contents ↑How to make a bunk bed with your own hands? Work stages
How to make a bunk bed yourself? First of all, you need to paint each manufacturing process in stages, so that in the process of work to avoid possible errors and break the bed. This step-by-step instruction will help you perform such actions without the intervention of specialists.
So, the process of making a bunk bed looks like this:
- We decide on the model that suits you best.
- We draw up a detailed drawing and diagram with a list of the number of parts.
- We make a list of the necessary materials and tools, and then purchase them at a hardware store.
- We prepare the details of the required sizes based on the previously created drawing.
- We assemble the main frame.
- We make a back, side walls, stairs and legs.
- Putting the whole structure together.
We described the shortest instructions for making a bunk bed, and a little further we will present you a detailed master class. Stay with us not to miss the most interesting and useful information for you!
to contents ↑Important! The most important thing in building a two-story berth is to build a solid frame, reliable side rails (walls), an easy and comfortable stair climb.
How to make a bunk bed?
Now we will tell you about the main stages, of which the whole process of making a bunk bed with our own hands consists of. Only their correct implementation will ensure you error-free operation.
Calculations and drawing of a bunk bed
Each stage must accompany the drawing, since all work requires special accuracy and care. It is the exact dimensions of the parts used, their height and thickness that will help to get the very positive result that you are striving for.
The list of what needs to be indicated on the drawing:
- The size of the final berth.
- Assembly diagram of all individual parts.
- Methods of joining wooden boards and whetstones.
- The installation order of each part.
- Dimensions of bunk bed parts and fasteners.
Materials
In the manufacture of a two-story berth, it is very important to choose the raw materials from which this design will be made. Experienced experts advise you to choose from the following types of material:
- Array From wood you get a beautiful, strong and durable construction.But to work with this type of material you will need building skills and carpentry skills.
- Lumber. They must be chosen from well-dried and high-quality specimens, since raw wood can swell and modify the bed, which can lead to cracks and even breakage.
- MDF. An excellent analogue to natural raw materials - wood. Products made from such a material look quite stylish and attractive. You have the opportunity to choose both raw and laminated MDF boards for the manufacture of a two-story bed.
Important! If you opt for unprocessed MDF canvases, then at the end of the work you should cover the finished structure with a stain or varnish. Such furniture will be neat and no worse than the factory version.
- Particleboard (chipboard). Only some parts of the bed can be made of this material: drawers under the base of the main frame, panel and back. It is very important to cover the ends of the parts with a laminated film to give the product a more attractive and complete look.
- Furniture shield. It is a canvas of pieces glued together. Such raw materials look not only very beautiful, but also allow you to perform carvings, make other interesting ornaments, and translate other design decisions into reality. But only an experienced craftsman with carpentry skills can work with a furniture board.
Important! Making a bunk bed made of natural wood is much more difficult and longer than, for example, from a laminated chipboard. To do this, you will need to pre-treat the lumber with special antifungal agents, and in the process you may encounter difficulties installing panels. That is why, if you are a beginner, use MDF or chipboard boards.
Instruments
It will not be so difficult for you to make a bunk bed with your own hands, if you prepare all the necessary tools in advance and recall some basic building skills. If in your practice there was a case of making wooden furniture, then you probably have some tools left. But still, let's get acquainted with the main list of necessary tools for manufacturing a two-story structure:
- Wood hacksaw.
- Grinder or planer.
- Screwdriver.
- Jigsaw (you can take the usual).
- Drill.
- Knives.
- Emery paper of different grit.
- A simple pencil.
- Building level.
- Measuring tape.
- Screwdriver Set.
- Pliers.
- Screws, bolts, nails.
- Metal corners.
Manufacture
So, we have ready drawings with calculations, materials and tools. Now you can safely proceed to the assembly of the structure:
- We make a frame for our mattress. We take 4 wooden bars with a cross section of 50x100 mm, we fasten them together in the form of a rectangle, which should be equal to the size of the mattress.
Important! Do not forget to increase the length and width of the bars by 20 mm, so that the mattress fits well into the frame. For fastening the bars, the best method is a tenon groove using high-quality wood glue. We used a milling machine to fasten all the parts, but if you don’t have one, then the metal corners are also good.
- We install the spacers in the finished frame using a board measuring 20x100 mm or a part from the same bar measuring 50x100 mm. It is imperative that you cut the spacer correctly with a hacksaw so that it fits perfectly into the wooden frame. The number of such struts depends on the planned load on the structure - they can be from 1 to 4 pieces (at 4 corners).
- We fasten the outer borders to the lower frame. So, for the lower berth we use canvases with a cross section of 20X150 mm, and for the upper tier, more durable ones - with a cross section of boards 20x200 mm. We screw the screws from the inside so that they do not pass through the canvases of the sides.
- We assemble four corner racks, which will partly serve as legs for a two-story bed.We pick up two bars with a cross section of 50x100 mm (the length is equal to the height of the structure, including the partition of the second tier) and fasten them at an angle of 90 °, so that we get an L-shaped wooden profile. Self-tapping screws should literally be drowned into lumber, and the holes formed should be puttied and sanded with sandpaper. As a result, we got 4 identical racks for supporting a bunk bed.
Important! These racks should be as strong as possible due to the fact that they will be the main load of this design.
- We mark and make holes for fixing the screw in the finished supports at the height of the first and second level chosen by us. The entire process of assembly of the structure is controlled by a level or a construction square, in order to prevent distortion of the structure. We make exactly the same holes on the bed frame.
- We attach a two-story bed to the wall to increase its safety during use by children. We attach the upper frame to the uprights with screws. After that, we attach the structure to the wall and mark out the future location of the fasteners. We drill in the wall the corresponding holes at the level of the second floor. The holes in the sleeper should pass through the racks, bars and frames. Firmly press the structure against the wall and fix it with screws. If you do not want to fix the bunk bed to the wall, then this step can be skipped.
- Set the right level of the berth. For reliability, we use metal corners.
- We make a fence or sides that can protect your children from falls. We fix boards with a cross section of 20x200 mm to the racks of the second tier, and boards with a cross section of 20x150 mm to the racks of the first. At the location of the stairs, we do not make borders, since they are not needed there at all.
- We make a staircase. We take two bars 40x60 mm in size and fix them to the frame of the structure above and below. We install the crossbars, fixing them with durable self-tapping screws.
Important! For a bunk bed, you can use a portable ladder, which does not require wall mounting. If your children are very active, then it is better to abandon this idea.
- We prepare the base for the mattress. We install a sheet of plywood or wooden battens from the lower and upper parts of the frame, and then carefully fix it.
- We sand the surface of the bed with glossy or matte varnish (optional). We close the visible ends with a thermal tape or a plastic edge.
- We are waiting for the varnish to dry and install a mattress.
That's all! Now your children can enjoy their holidays in such a wonderful, and most importantly - a comfortable private bed! At the last stage, you can not stop, but continue to equip the furniture with additional details that will make it even more compact and functional.
to contents ↑Important! For the assembly of a double-decker bed, it is better to use bolts and screws, which, if necessary, allow you to disassemble and assemble this structure.
Recommendations:
- Think carefully about the location of the crib: it should not be near the window, in the aisle or close to heating appliances.
- Consider the location of the stairs in advance so that your children can comfortably go down and climb it. It is better to install the stairs on the right, left or side, but not in the center of the structure.
- The bars used should be above the level of the sunbed to the height of the sides or back. The height from the frame to the bottom of the mattress should be at least 30 cm.
- The distance from the lower floor of the bed to the floor should be such that the child and adult feel as comfortable as possible.
- The distance between the lower and upper levels should allow you to sit comfortably inside both a child and an adult. It will be convenient for you and your children, who will not hit their heads on the upper tier of the structure.
- The height of the second tier to the ceiling level should be no less convenient than in the case of the first level. The ideal distance is considered to be the distance to the arm extended upwards + 5-10 cm.
- If you plan to use a bunk bed for more than one or two years, then make a large structure (with a margin). The only caveat is the mattress, which needs to be changed in the future.
Stock footage
Now you know how to make a bunk bed with your own hands. As you can see, there is nothing complicated and unusual in the work. Making such a universal sleeping bed for your children will allow you not only to save well, but also to realize your design ideas!
- How to choose a vacuum cleaner taking into account the characteristics of the house and coatings?
- What to look for when choosing a water delivery
- How to quickly create comfort at home - tips for housewives
- How to choose the perfect TV - useful tips
- What to look for when choosing blinds
- What should be running shoes?
- What useful things can you buy in a hardware store
- Iphone 11 pro max review
- Than iPhone is better than Android smartphones
 (No ratings yet)