

DIY desk with drawings
Children's furniture is always in demand. When buying it, each parent pays attention to the material from which it is made. Headsets made of natural wood are especially popular. However, the cost of such furniture is always above average, and not every buyer can buy it. Today we will consider what a children's desk can be with our own hands. With the drawings and the necessary equipment to deal with it will not be difficult at all. We will tell you how to make comfortable furniture with minimal knowledge, lack of experience and a small amount of money.
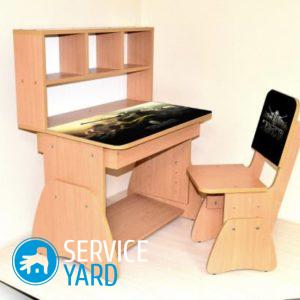
to contents ↑Small school desk made of natural materials
A children's desk is an indispensable attribute for teaching children. This furniture accessory can be not only at school, but also installed at home. At the same time, in order to make it, there is no need to spend huge amounts of money.
Important! To make a children's desk with your own hands, it is necessary to understand the drawings from the very beginning, and on the basis of them to purchase all the necessary components. In fact, all patterns of “patterns” of furniture are identical to each other and can only differ in the size of the desk.
Materials for work
To make school desks at home, you must have:
- confirmations;
- self-tapping screws;
- hinges for piano, 50 cm long;
- corners made of metal;
- sandpaper;
- cut from plywood according to the drawing;
- screwdriver;
- jigsaw;
- Sander.
Assembly instructions for the table:
- All clippings according to the template from plywood must be processed with sandpaper. Get the best possible result. Let them be more smooth and less uneven. To perform this operation, you can use a grinding machine or similar machine.
Important! When sanding wooden surfaces with sandpaper, this operation must be done in three stages. At the first stage, treat with P40 grain, then with P120 and P220. In this case, you will achieve the best result.
- All sharp corners on the furniture blank must be rounded with a jigsaw.
- For convenience, we recommend that you cut out semicircular notches in the sides of your future home school desk. They are necessary so that the child is more comfortable sitting and learning lessons.
Important! When forming this design, your child will not rest against his knees when turning, he will not interfere with the sharp corners of the table.
- At this stage, you need to attach the legs to the bottom of the box. This operation is done with the help of confirmations. Before that, it is worth drilling holes for these fasteners.
- Now you need to lower the bottom eight centimeters lower than the edge of each leg.
- We fix the front wall of the resulting workpiece.
Important! It should be borne in mind that the upper edge should be level with the legs. This is necessary to ensure that the design is almost flat and perfect.
- Using a screwdriver, attach the screws to the back wall of the workpiece. At this point, you will have a ledge. It will be several centimeters higher than at the edge of the legs of the structure.
- Using the piano loops we fix the countertop. After you fix this part of the furniture, you will get a box in which you can store various items for lessons, drawing or other items.
Important! Please note that:
- the child should easily raise and lower this structure;
- it should move without sticking and difficulties;
- when closing the countertop, the surface should be flat.
School desk for the student with his own hands is ready! Now you can start making the chair.
to contents ↑Important! School desk for a student with his own hands is done very easily. With minimal knowledge, a great desire and a small sum of money to purchase basic materials, you can make an excellent piece of furniture for your child.
We make a chair for a school desk at home
If you are doing a children's desk with your own hands, you have figured out the drawings and made the entire structure, then you can start making a chair. Moreover, this accessory is present in the schemes for the manufacture of furniture for schoolchildren.
So:
- At the first stage, you need to cut out the details for the baby chair according to the drawing.
- Then clean out all the bumps and round the corners.
- We assemble the chair, according to the sketch.
- We fasten all parts to each other with a screwdriver and confirmations. We advise you to fix all the details as best as possible, especially for the backrest and the crossbar under the seat, as all children love to ride on the legs of a chair.
Important! If desired, you can give a unique design to the chair. For example, cut a figure on the back of a chair. For example, a heart, circle, or flower. This must be done with a jigsaw.
- The final step in the manufacture of school desks for a student with their own hands, along with a chair, is varnishing.
to contents ↑Important! We recommend giving preference to acrylic varnish. It is absolutely harmless, odorless and dries quickly enough. Cover all surfaces in two or three layers.
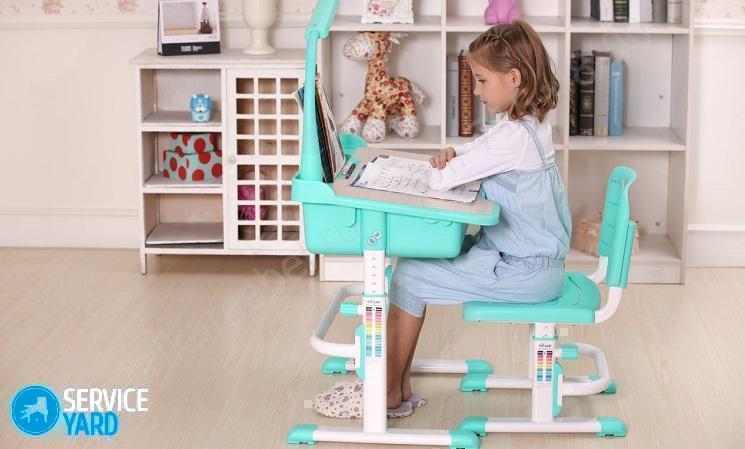
We make a table, adjustable in height, with our own hands for students
If your child goes to school, then one of the main problems that parents face is the choice of a school desk for the child. This question relates to furniture installed at home. We suggest you make a table, adjustable in height, with your own hands. It has a large number of advantages compared to other pieces of furniture for teaching lessons and the cost of this desk is quite low.
Important! Making an adjustable table will allow you to change the height of the tabletop from 57 to 72 cm, while the step is 5 cm. In addition, you can change the angle of the table from 0 to 90 degrees. The last indicator is theoretical, the adjustment step does not exceed 5 degrees.
The Ministry of Health recommends changing the angle of inclination of the desk depending on the purpose:
- use 0-5 degrees for drawing;
- letters - 10-15;
- for reading - 20-30 degrees.

Materials for work
To make a table adjustable in height with your own hands, you will need:
- base;
- lifting mechanism;
- countertop.
Important! The school desk with an adjustable table top is made of planed wood. This material will need to be sanded first, as described in the first part of our article.
Instructions for collecting an adjustable table:
- We get planed wood.
- Grind the surface.
- According to the design on the guide board, we mill a special groove. Its size is 1x1 cm.
- Round all sharp corners on the structure. This is best done with a grinder. It is possible to perform with different emery paper.
- We connect an adjustable countertop. For this we need threaded rods, nuts and washers.
- We attach the upper shelf and the stand under the legs with the help of confirmations.
- The lifting mechanism is made according to the drawing.
- On the lifting mechanism, it is necessary to mill two grooves measuring 1x1 cm. In the center of the surface, it is worth drilling four holes with a diameter of 2 cm.
- When assembling the structure, it is necessary to insert the lifting mechanism into the base, then fix the tabletop. This is done using studs, nuts and bolts.
The table, adjustable in height, is ready with your own hands!
to contents ↑Stock footage
Making a children's desk with your own hands with drawings and in the presence of all components will not take you much time, money or effort. At the same time, you will make an item that will be safe, beautiful and loved for your child!
- How to choose a vacuum cleaner taking into account the characteristics of the house and coatings?
- What to look for when choosing a water delivery
- How to quickly create comfort at home - tips for housewives
- How to choose the perfect TV - useful tips
- What to look for when choosing blinds
- What should be running shoes?
- What useful things can you buy in a hardware store
- Iphone 11 pro max review
- Than iPhone is better than Android smartphones
 (No ratings yet)