

DIY earrings - it's beautiful and stylish

Every woman strives for excellence, choosing her hair, shoes, clothes and accessories. Jewelry, especially earrings with their own hands, now, as before, remain in trend. Having a sense of style and taste, you can make very beautiful exclusive products on your own. How to make earrings with your own hands will be discussed in this article.
to contents ↑Necessary tools and materials
A very important point when creating original DIY earrings is the preparation of materials and tools. Accessories that may be suitable for realizing your imagination can be bought at needlework stores.
For this, it may be suitable:
- beads;
- beads;
- polymer clay;
- lace;
- tapes;
- feathers;
- cold porcelain.
Be sure to stock up on the necessary materials:
- wire - useful for stringing beads and beads on it;
- clamps and plugs are needed for fixing;
- earrings and pins for earrings - you will thread them in your ears, so be sure to pay attention to quality;
- other fastenings and rings for beads.
And, of course, the tools that may be necessary for this type of needlework:
- pliers;
- round pliers;
- tweezers;
- scissors;
- Stacks
- thermogun with glue.
Beads
The most affordable and easy-to-use material for making beautiful earrings with your own hands.
Key ideas for creating earrings from this material:
- Carnations. To create this type of product, it is necessary to connect beads to each other. The first will be on the outside. Then a three-dimensional circular pattern is woven, with a part of the wire of each row going through the initial element.
- Rings. In the manufacture, you can use the scheme of circular weaving. It is also possible to use a base for stiffness.
Important! Such earrings can be in the form of plates filled inside or contoured.
- Volumetric figures - flowers, berries, beaded bows. Beads tied with beads are very popular.
- Schematic weaving. A variety of colorful and plain patterns - stars, polyhedrons, delicate weaving loops, patterns of which can be found in large numbers on the Internet.
- Hangouts. One of the most popular types of earrings, the creation of which uses the basics in the form of a ring, square or diamond. Pieces of bead threads are subsequently attached to this base. A small chain can also be used for them.
- Complex compositions. For this type, ready-made elements or several schemes can be used that are interconnected by wire, hot melt adhesive or rings. An interesting option is a combination in which a large stone is framed by an ornament of beads.
Beads
DIY handmade bead earrings are easy to make. Moreover, in some cases, to make one pair, you may need only a few pieces. You can use beads of various sizes, combine them with beads or other materials:
- Use plastic beads for children's jewelry.
- Imitation gemstones or beads are suitable for elegant and glamorous models.
- Openwork metal or wood beads are suitable for creating ethnic motifs.
- Making beads from polymer clay, you can create parts with an unusual texture, but it will be quite difficult to make them the same size.
Important! You can connect beads to wire, fishing line, using rings and ribbons, it is also possible to use crochet elements. In principle, depending on your imagination and abilities, you can use various methods.
Feathers
If you use feathers as the main decorative element, you can get simple and very beautiful earrings with your own hands. Suitable material can be purchased at hand-made stores.
Important! The usual feathers of birds on the street should not be picked up, serious diseases can be acquired with them.
For the manufacture of jewelry with feathers, you should use special clamps to fix the feathers. Additional elements can be used beads, beads, blanks for earrings, metal rings and a chain. Using threads, you can make a miniature dream catcher.
Ribbons
Organza and satin ribbons are a popular item for do-it-yourself jewelry.
How to make earrings with your own hands using ribbons? Kanzashi technique involves the use of ribbons in the manufacture of jewelry. But often uses a combination of them with beads or beads. Also, the tape can serve as a decorative part or mount for elements.
Important! Burn the edges of the ribbon over a fire so that they do not open. To obtain a fringe, it is necessary to dissolve the material from one edge, and to burn the second edge.
Lace
To make elegant and unusual lace earrings, you will need a lace ribbon or a small piece of fabric. Such jewelry will be a little expensive, but they are very easy to make with your own hands. To do this, you need to select and cut an element that is suitable in size and shape, and then use a metal ring to fasten it to a hook.
Glue rhinestones, beads or small beads will complement the composition, but do not overdo it.
Important! Lace can be made independently using the weaving technique (tatting, macramé). To make it convenient to work, first draw a template on paper and place it on a pillow with needles, around which you will weave a lace element. Choose strong, thin threads for work.
Polymer clay
To make earrings made of polymer clay with your own hands, first of all, you need to buy high-quality material. You can buy it in stores that sell products for creativity. The cost of sets depends on the composition and manufacturer, and may vary significantly.
Of particular difficulty when working with clay should not arise:
- Work should begin with kneading the material, after which you can form the earrings, giving them the desired shape - beads, flowers, berries, hearts. You can always get ideas for jewelry in jewelry departments.
- This material is perfect for both adult women and youth and children, as any figure can be made of polymer clay.
- After giving the product the necessary shape, you need to let it dry and burn in the oven.
Important! Do not forget to insert the hooks or make holes (for stringing after firing) in a still raw product.
Cold porcelain
This original material is very similar to polymer clay. You can buy cold porcelain in art stores, however, its cost is rather big.
But do not despair, at home you can prepare its analogue:
- Mix in equal proportions PVA glue with plasticizers of brand D and corn starch with soda.
- Add some glycerin (for ductility).
- Put on the fire and cook until a dense lump forms on the spoon.
- Mash the lump with a damp towel, let it brew for a couple of hours.
The resulting plastic white mass is in no way inferior to polymer clay.
Cold porcelain allows you to create the finest work, for example, flower earrings, which will amaze with their realism.Any shade of the material can be given by adding food coloring.
Important! Unlike polymer clay, cold porcelain products do not require firing - they just need to be left to dry. After that, fragile-looking jewelry becomes durable.
So, armed with the necessary tools and materials, you can begin to create beautiful earrings with your own hands.
to contents ↑Workshop on making paper clips from paper clips:
- The first thing we do is expand the paper clip in the shape of a triangle (you can bend it into another shape, for example, a heart).
- To avoid a gap in the base, the edges are connected using glue gun with glue.
- Using the same glue or “Moment” glue, glue the thread to the paper clip and leave it to dry.
- We wrap a paper clip with a thread, leaving no empty space, and then the contour, creating a chaotic ornament, horizontal lines, nets.
- The edge of the thread is fixed with glue.
- We connect the shvenza to the workpiece and try on.
Important! Using threads of various colors and various techniques of winding threads, you can get a variety of products for every style and color of clothing.
Glamor and charm to these earrings can be added to beads previously strung on a thread.
to contents ↑Ganutel earring workshop
To make earrings with your own hands, first of all, you need accuracy and perseverance. But the result can be overwhelming, given that material costs will be minimal.
Necessary materials and tools:
- Thin and thick wire;
- Silk threads for embroidery or crochet iris;
- Ruler;
- Scissors;
- Nippers;
- Wire navigator (consider how to replace it with other means);
- Schwenzy;
- Beads (optional).
Making the base spring
It is necessary to cut the desired length of the thick wire, gently wrap a thin wire on it. To give the product a professional look and speed up the winding process itself, a wire winder will help.
It is clear that not everyone has it, so we suggest using the means at hand:
- To create a home-made navigator you will need a knitting needle (2 mm in diameter) with a bent end and a plastic box from a kinder surprise.
- The box is pierced through with a needle.
- The end of the wire is threaded into the knitting ring and tightly fixed so that it does not fly off during the winding process.
- The stopper in this case is a plastic box.
- You should wind the wire by pressing it firmly with your hand to the box.
- Upon reaching the required winding length, the wire should be bitten off, leaving a small tip.
Spring stretching
The resulting wound spiral is removed from the spoke and stretched like a spring. The best option would be if equal gaps are formed between the curls, which are equal to the thickness of the thread used.
Important! Having done the above steps, you can cut off the ends of the spring, leaving only a spiral for operation.

Frame manufacturing
A thick wire frame is inserted inside the spiral, which helps maintain the shape of the decoration.
Form creation
This is a matter of taste and thought in general. You can give the spring various shapes - a rhombus, circle, square, droplet, heart.
Important! Having gained experience in the ganutel technique, be sure to try to make earrings in the form of a peacock feather.
After shaping, create a loop and twist the ends of the wire at the very base.
Threading the warp
This is the most interesting stage of work. Having picked up a certain color gamut, alternating colors and using different directions when winding (parallel, from the middle, etc.), after 5-10 minutes you can see the result of your labors.
Important! One turn of a spiral - one step of winding a thread.
Decoration with beads, sparkles, rhinestones, feathers
If desired, you can decorate the earrings with additional elements.
Attaching Schwenza
Surely you will not forget to attach the earring, as without this element it will be impossible to wear these beautiful handmade earrings.
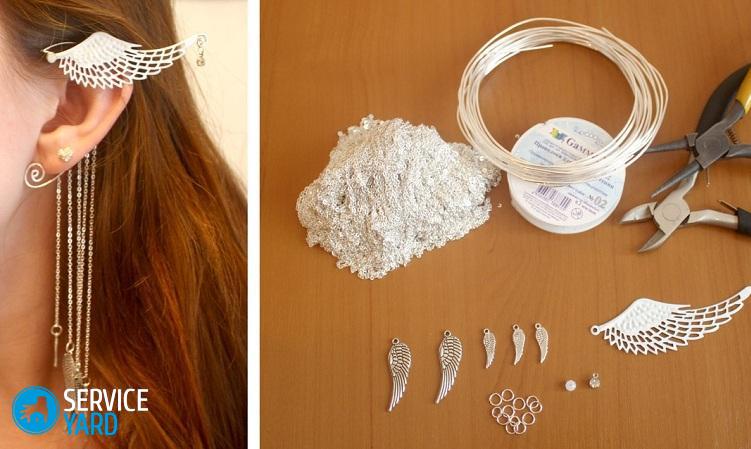
to contents ↑Workshop on making earrings from wire
To make stylish and original wire earrings with your own hands, you will need the following materials and tools:
- wire;
- connecting rings - 6 pcs.;
- shvenzy;
- metal pendants;
- beads;
- pliers;
- nippers.
Work Stages:
- Cut three pieces from the wire in one ring.
- One of the obtained rings is cut in half.
- To make one earring, we use one large ring and one half (it will be a small ring of the earring).
- We bend one edge of the large and small rings in the form of a loop.
- We string beads, pendants, chains on the free edge of the rings, according to the idea.
- We bend the loops from the other edge of the rings.
- We fix on the connecting ring - a ring, a large ring, a small ring and a ring.
- Repeat the same procedure from the other end.
- The central ring needs to be hooked onto the swivel and close the loop.
- The second earring is made similarly.
Bead Earring Workshop
Even a beginner can make earrings from beads with their own hands, and the master class below will help in this.
Important! Earrings made of natural stones will look stylish and expensive.
Necessary materials and tools
- round pliers;
- side cutter;
- shvenza - 2 pcs.;
- wire - 60 cm;
- connecting rings - 4 pcs.;
- beads with a diameter of 3 mm - 82 pcs.
Important! Choose the diameter of the beads based on personal preference. Fans of large jewelry can take beads with a diameter of 6-8 mm. Moreover, for work it is better to use all beads of the same diameter.
Work Stages:
- Cut off 30 cm from the wire, string 4 pieces on it. beads.
- We form a circle of beads by threading the wire crosswise in the fifth bead.
- We string three beads on the left end of the wire, and one on the right.
- We pass the right end of the wire into the third (last put on) bead of the left edge of the wire.
- Tightening the ends, we get two circles of beads.
- Repeat steps 3-5 until you get 7 circles of beads.
- Put 2 beads on the left edge of the wire and one on the right.
- Pass the right end of the wire into the bead of the first circle - you will see that according to the resulting picture, this bead will be the second in a row from the total with the second circle of beads.
- To form the last circle, you need to pass the right edge of the wire into the last put on bead of the left end of the wire. The main element of the earring is ready and has the shape of a circle.
- Put two beads on each edge of the wire, thread them in the opposite direction with the other edge of the wire.
- Twist the remaining ends of the wire slightly and cut.
- Similarly, make a second earring.
- Using round-nose pliers, attach two connecting rings to the upper circle of beads.
- Also, with the help of round-nose pliers, we attach to the product the shvenzy.
Original DIY earrings are ready! Having spent a small amount of time, you can get a beautiful decoration that will suit even an evening dress.
to contents ↑Stock footage
Of course, these are not all options for making earrings with your own hands. Having mastered the described manufacturing techniques, having gained some experience, you can make more complex models. Studying information on this topic, you will undoubtedly want to replenish the collection with your own earrings, such as tassels, cuffs. Create and indulge yourself with beautiful jewelry!
- How to choose a vacuum cleaner taking into account the characteristics of the house and coatings?
- What to look for when choosing a water delivery
- How to quickly create comfort at home - tips for housewives
- How to choose the perfect TV - useful tips
- What to look for when choosing blinds
- What should be running shoes?
- What useful things can you buy in a hardware store
- Iphone 11 pro max review
- Than iPhone is better than Android smartphones
 (No ratings yet)