

How to remake a jacket?
You do not know where to put your old things that have long gone out of fashion? You can’t even imagine what can be made of them! For example, cutting off the frayed sleeves of your favorite blouse and sewing on this place guipure sleeves, you will get an elegant blouse. To the question of how to remake the jacket there is also your answer, which you will learn about in our master class. We will introduce you to various ways of remaking old clothes into new ones. You are so keen on this activity that it will be impossible to stop you.
to contents ↑DIY clothes remodeling - from old to new
Altering your things is by no means a sign of poverty, but a special kind of creative art. Instead of just collecting dust and taking up space in the closet, you can really make something useful out of it. So, let's look at a list of what can be made from old clothes:
- Dresses.
- Textile or denim bags.
- Original T-shirts (we are talking about remaking an old T-shirt).
- Jeans or shorts with lace and other trimmings.
- Tops and T-shirts.
- Skirts from an old dress, jeans, rags.
- Socks and knee-highs from a warm sweater.
We have presented you only a part of what really can be done from old things. This list goes on and on! Further, we will consider several ways of remaking that will be possible even for the most inexperienced seamstress.
to contents ↑Shorts from old jeans
Most often, jeans clothes are redone due to external defects: abrasions at the bottom of the legs or crotch, torn sections of fabric and so on. For work, only whole sections of jeans matter are taken, and the damaged ones become unusable. We are used to wearing spoiled clothes at home or in the country, so that no one except you will see it. Let's not go to such extreme measures and remake the old jeans into stylish shorts with our own hands.
We will prepare everything you need, namely:
- Old jeans.
- Threads in tone.
- A needle.
- Well sharpened scissors.
- Elements for decoration (lace, beads, beads and so on).
- Tape for hemming the bottom of the trousers.
- Chalk or remnant.
Working process:
- Put on jeans.
- We stand in front of the mirror.
- We measure the desired length of future shorts on the product with chalk, adding 1 cm to the bottom hem. If you plan to make shorts with a roll, then you need to make one more mark showing the width of the extra fold.
- Take off the jeans.
- We draw a chalk or remnant of a straight line passing through our lowest mark. If you are sure that you can trim the pants evenly, then this point can not be missed.
- We cut off the pants along the marked lines. Since we sew simple shorts, we tuck the bottom edge inwards a few centimeters, and then simply hem (you can use the tape to trim the bottom of the trousers). In the case of shorts with a lower backing, it is necessary to bend 1 cm of denim to the top of the product, and then make another hem and hem it.
We made such clothes with our own hands in the form of jeans shorts!
to contents ↑Dress from a man's shirt:
- We pick up an old shirt with long sleeves.
- Expand the collar of the shirt.
- We attach the back of the product to ourselves so that the collar is at chest level. He will serve as a bodice for our dress.
- Tie the sleeves of the shirt on his back.
- Button all buttons.
- Cut off the sleeve and the edge of the collar from the product.
- Make the edge of the shirt even. Wrap it and gently sweep.
- We apply the above actions to the second sleeve.
- Sew buttons to the previously designated place on one sleeve (optional).
- We make holes for the loops on the other sleeve. We process each loop with a thread, and if you have a machine for creating loops, then use it.
So do-it-yourself clothes at home!
to contents ↑Bag of old jeans:
- We take old jeans and cut off their legs. For work, we used several jeans of different colors, taking shreds from them.
- We sew shreds together, forming a jeans rectangle.
- We trim the sides of the resulting figure.
- Turn the cut over with the back side and fold it in half.
- We cut jeans on the sides.
- We make two ribbons for the pens of our bag.
- We turn the bag and wrap its edges to which we apply the finished handles.
- We sew everything in a double line.
The denim bag is ready to use!
to contents ↑How to update a coat with your own hands? Ideas
Remaking a coat is not a difficult process, but you still have to work hard. You can experiment with any details by trimming, remaking and decorating them with various elements. Now we will remodel the coat without defects: scuffs, holes and so on. Our coat coat has retained its original appearance. In this master class, we will alter the coat in a fashionable jacket “jackets”. The whole process of remaking consists of several stages, which we will talk about now.
Work Stages:
- We steam the sleeves so that in the future it will be easier for us to work with the product. We perform this action also because the coat is a little large, so we need to tear off the sleeves to fit the line of the armhole. We lay aside the sleeves, since we do not need them yet.
- We redesign the sides on the shelves of our product. We find the center on them by measuring the entire distance divided by two. This mark will be the center of the shelf.
Important! If the fabric is in the “herringbone”, then determining the center is quite simple - by the vertical pattern.
- We draw a new line of the side from the received mark of the central part. Draw up the diagonal from the bottom center line. This mark will gradually expand relative to the size of the width of the lapel.
Important! Our coat has a collar, so the width of the lapel is equal to and will be the width of our turn-down collar. If your product is without a collar, then determine this value yourself.
- Performing the above actions, we form the board and on the second shelf.
- We cut out the collar from the remains of the fabric (it is possible with a seam). We cut the adhesive strip according to the shape of our part. We glue the non-woven upper part of the collar from the wrong side. Steam the adhesive fabric with an iron.
- We grind the collar with a finishing line along its upper part.
- We cut the edge of the lower part of the collar by 1 cm so that when we undo the fabric on our coat there will be no influx of material from the lower part. This effect can lead to a loose fit of the collar on clothing.
- We sweep away all the details of the collar along the lower edge for easy stitching.
- Stitch the collar in the neck so that we get a small fit. This must be done moving from one center of the shelf to another so that when fitting the collar coincides with the joints.
- We sew one part of the zipper with temporary stitches to the left side of the shelf. For this, we chose a fastener that carries not only functional, but also decorative purpose. That is why we will not hide the clasp in order to use it as a decoration for our product.
- We adjust the zipper in two lines: one near the teeth, and the second near the edge of the braid.
- Sew the second part of the zipper to the side of the right shelf. We combine the slices, pin the board with tailor's pins from the beginning to the zipper, and then to the clothes themselves.Lay a line along the second part of the fastener.
- By such manipulations we process the left side on the shelf, sewing both the lining and the coat at the neck.
- We make new horizontal marks on the armholes for processing sleeves. Now we sweep and stitch the sleeves. Sew in the syntepon window sill (insulation strip) into the seam of the sleeve connection. This will give the sleeves an attractive shape.
- Iron the previously made seams of the sleeves on the rib. We direct the allowance at the place of okat towards the sleeve. Carefully iron the allowance on the front side using a convenient ironer.
- We turn the coat on the front side, grind the sleeves, sweep the edging along the edges of the side and along the neck.
- We lay the finishing lines on the sides from the front. You choose the width of the stitches yourself, but they should start and end with the previously made finishing stitch on the stand-collar.
- We lay the machine line along the neck of the back of the product.
- Removing all the threads that were used for basting temporary seams.
- Iron all the details with an iron.
to contents ↑Important! By the same principle, you can redo the jacket.
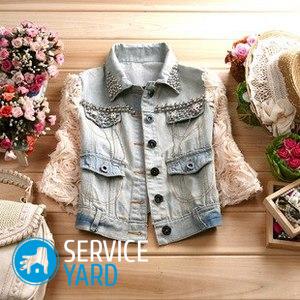
How to remake a jacket?
Surely you have an old men's classic suit hanging out of your wardrobe, which has long gone out of fashion or just worn out. Most often, men's suits are made of high-quality fabrics that are difficult to accidentally tear or ruin. Want to make a new thing out of it to update your wardrobe? We are happy to help you. To do this, we only need to take its upper part - a jacket. We will redo it. In the skilled hands of a needlewoman, a jacket can get a second long life in the form of a stylish women's vest. You will spend about 30 minutes of free time reworking your jacket. Agree, it is simply incredible to get a new vest in such a short period of time!
Materials and tools:
- Blazer.
- Threads in tone.
- Needle.
- Scissors.
- Sewing machine.
- Elements for decoration.
Working process:
- We pick up a ready-made jacket and cut off the sleeves from it along the shoulder seam. We perform these steps very carefully so as not to violate the integrity of the lining.
- We cut the armhole of the sleeves, since the vest must have a deeper cutout.
- We process the edges of the armhole. For this we used leather strips. You can take any other material to close the trimmed edge - leatherette, textile or satin braid and others. Be guided by your taste.
- Cut off all the buttons on the jacket.
- Sew the zipper along the two central lines of the product (where the buttons were).
- We decorate our vest with various decorative elements. To do this, we took patch inserts with spikes that were sewn to the shoulder seams. You can use whatever you want, the main thing - do not overdo it with the amount of jewelry.
- Do-it-yourself vest is ready to please your mistress!
to contents ↑Important! As a decor for your new vest, a fur collar and a narrow leather belt are perfect, which must be used in different variations of the product. For example, a belt will complement well a classic vest, and a fur collar - outerwear with a zipper. Do not forget to take into account all these nuances in order to look beautiful.
Recommendations:
- Do not remodel clothing from very old fabric, as it may tear even during the manufacturing process of a new product.
- If you decide to decorate a thing with paint, then for this, take only high-quality dye, intended for painting on fabric. So the paint will not be erased and not washed off, and you will wear these clothes for a long time.
- Before you cut and cut new clothes, sketch a sketch of the desired thing.
- Try to hide defects of the old fabric correctly by adding various elements and inserts during sewing.
- If there were buttons on the old clothes, it is better to replace them with new ones.
Stock footage
We have no doubt that now you can remake your old things with new ones using our simple workshops. As you already know, changing clothes is not only profitable, but also very interesting. Who knows, maybe this will be an impetus for you to create real designer creations!
- How to choose a vacuum cleaner taking into account the characteristics of the house and coatings?
- What to look for when choosing a water delivery
- How to quickly create comfort at home - tips for housewives
- How to choose the perfect TV - useful tips
- What to look for when choosing blinds
- What should be running shoes?
- What useful things can you buy in a hardware store
- Iphone 11 pro max review
- Than iPhone is better than Android smartphones
 (No ratings yet)