

How to make a pattern of a collar on a coat?
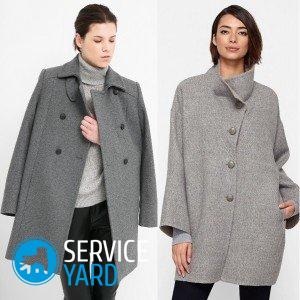
Despite the fact that clothing designers now offer a lot of models that are made without any patterns, most of the products are still sewn according to patterns - made to order or translated from a magazine. These are fairly simple ways if you want to sew something quickly, and for the vast majority of beginner needlewomen, they are quite suitable. But if you intend to do sewing seriously, you have to learn and cut, then you will not have a question how to make a pattern of a collar on a coat, pocket and even the coat itself. Our article will discuss just that.
to contents ↑A bit about letters
If you look for instructions in some old sewing book, be sure to make sure that the old drawings are not particularly similar to those in the magazines. On a modern pattern, you see only a few notations - arrows and main points. But there are always a lot of letters in grandmother’s books on drawings.
Everything is very simple. It was once important that under any guidance it was possible to sew a thing of any size. Therefore, a general principle was indicated, and each craftswoman, even a beginner, simply did everything in her size. At the same time, letters were often used with which the name of a line began - for example, all points on the waist line were designated as T with different numbers, G is the chest line, B is the hips. It was worth understanding, and the situation immediately clarified. Nothing prevents you from following this principle even now, when you begin to build your first pattern.
to contents ↑We are trying to figure it out
To answer the question of how to build a pattern of a coat, as well as dresses, blouses and everything else, you should understand what exactly you need. To start, a few things:
- a sheet with recorded measurements;
- a large sheet of graph paper;
- long ruler (tailor's meter is ideal);
- elbow
- pencil.
Take measurements
This standard process is needed when building any pattern, so it's best to do the job once and for all. In addition, having managed to build a coat pattern, you will receive basic patterns for any product.
Important! We take the most common tailor's centimeter - best with centimeter rather than inch divisions.
Horizontal measurements
The following horizontal measurements will be required:
- neck girth (measured from the hollow in front around the base of the neck);
- chest girth (at the most prominent points of the mammary glands);
- waist circumference (on the narrowest part of your figure);
- thigh circumference (on the bones and buttocks);
- shoulder length (from the base of the neck to the end of the shoulder);
- shoulder width (distance between the clavicles);
- girth of the arm (the widest part of the forearm);
- girth of the wrist.
For some products, both the second chest girth (above the mammary glands) and the girth under the chest are measured. You can measure this at the same time, but you will not need them for a coat.
Important! When constructing a pattern, all horizontal measures, except for the length and width of the shoulders, arms and wrists, are divided in half.
Vertical measurements
Vertical measurements should be taken while standing straight, legs joined and straightened back. Measure:
- the length of the product along the back from the cervical vertebra to the bottom;
- length to the waist;
- distance between the waist and hips:
- sleeve length (along the bent arm from the end of the shoulder to the wrist);
- the distance between the waist and hips.
to contents ↑Important! Vertical measurements are taken completely.
We proceed to the construction
After the measurements are taken, you can try to figure out how to make a coat pattern for women. We spread a large sheet of graph paper on the floor or on the table (you can rewind from the roll until you cut it off). We will dance from an arbitrary point, which is better to put somewhere on top of the sheet, closer to the middle, on the right side.
All constructions will go from right to left, so you need a little more space on the left side:
- Put a point and mark it with Ш, which will mean its location on the neckline.
- Set aside your left half-circumference of the chest, 7 cm and another 3 cm - the mark will be located here Ш1: from the mark Ш you will build a shelf, from Ш1 - the back.
- Divide your chest circumference by 24.
- From Ш1 put this result to the right and another 0.6 cm, put Ш2.
- Divide the same measure by 6.
- Put the result from the mark Ш1 to the left, and another 0.7 cm in the same direction, this will be the point Ш3 ..
- Connect the points Ш2 and Ш3 with a smooth line.
Coat Bottom:
- From point W, lay down the length of the product.
- Based on this line and the existing values, draw a rectangle.
- On the line that goes from W1 towards the bottom, set aside the distance to the chest and waist lines.
- Put the markers G1 and T1, draw horizontal lines through them.

Building an armhole
To do this, again, you need to apply some mathematical calculations:
- Divide your height by 8 and write down the result.
- From point W, lay down both of these measures, one after the other, and then another 2.7 cm, put the designation P1.
- Draw a horizontal line through the resulting point to the intersection with the vertical one - with the middle of the front.
- Divide the resulting segment in half.
- Set aside 1 cm to the left.
- From this new point, lower the perpendicular to the bottom line.
- So you get the width of the back half
- The waist and hips you have already outlined, now you need to determine the width of the back.
- Set aside the point Ш half the width of the back and another 2 cm, put the point Ш4.
- From Ш4 lower the perpendicular down to the armhole line.
Thus, the basis for the pattern of the back is ready for you. Mark the tucks:
- Divide the waist line in half on the half back pattern.
- Mark B.
- From this point on both sides, set aside the distance equal to the difference between the semi-girths of the hips and waist divided by 4.
- Designate B1 and B2.
- Through point B, draw a perpendicular to both sides of the waistline.
- Set aside segments equal to your height divided by 24.
- Set points B3 and B4.
- Connect points B3 and B4 with points B1 and B2 to make a rhombus.
Pattern before
Here the main point is the mark Ш1. From the back pattern, this pattern differs in two main points - the depth of the armhole (in front it is larger), the depth of the cut. We will defer all measurements from point W1 to the right. In this case, you already have the main lines:
- On the horizontal line, where the mark P1 is located, or more precisely, from the opposite side of the rectangle, put 3 cm to the right.
- Lower the perpendicular to the bottom line.
- Draw the perpendicular to the bottom - get the line of the middle of the back.
- Along the line of the chest from its intersection with the armhole, set aside a segment equal to the height of the chest, and put the point Br.
- Through the mark of intersection of the armhole with the chest line, draw a perpendicular on both sides.
- On a perpendicular on both sides, measure the distance equal to the half-circumference of the chest divided by 6.
- Put the designations Br1 and Br2.
- Connect these points with the mark Br in straight lines.
Neck
As you probably noticed, the neck at the back and front has different depths. Therefore, on the front part (that is, from point W), lay 5 cm down, and from W1 - 3 cm, put points G3 and G4:
- From both points, we lay aside the shoulder half of the neck, divided in half, plus another 1 cm - this will be the end of the neck.
- We connect the obtained points with G3 and G4, respectively.
Shoulder line
Points G3 and G4 are on your horizontal line. From them, lay the length of the shoulder along this line - in the direction from the neck. Set the points Pl and Pl1. Farther:
- Put 2 cm down from these points.
- Put the designations Pl2 and Pl3.
- The marks Pl2 and Pl3 are connected by straight lines with G3 and G4, respectively.
- Continue the segment by measuring the shoulder length from the markers G3 and G4.
- Connect the obtained points with the lower parts of the armhole with smooth lines.
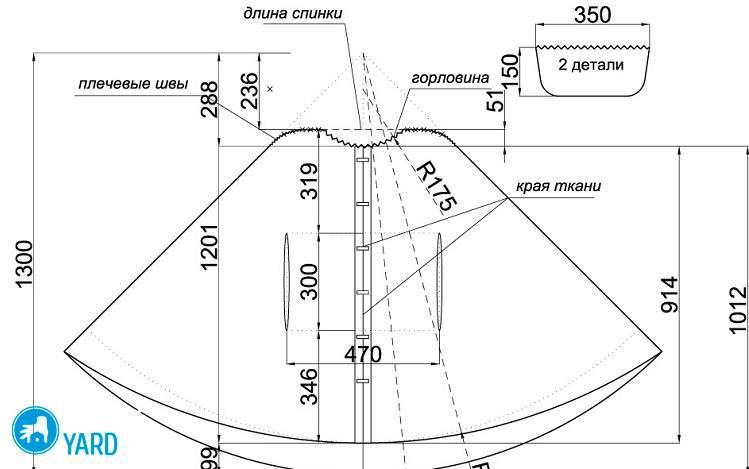
Sleeve
For the sleeve, we build a rectangle along the length and width of the sleeve. We mark the bottom line - for example, all points on it will be designated as HP with all sorts of letters. BP - respectively, the top, and O - okat:
- Divide the line of BP in half.
- We put the point O1.
- We postpone the height of the armhole from it.
- Draw a horizontal line - for example, PR.
- From this point, we lay to the right the chest circumference, divided by 8, plus another 3.5 cm.
- Draw a perpendicular to the intersection with the line BP.
- To the other side we postpone the chest girth divided by 6 and 4 cm.
- Also draw a perpendicular.
- On the perpendiculars we postpone the girth of the arm divided by 4.
- We connect these points with point O1 in smooth lines.
- We divide the HP line in half.
- We set aside half the girth of the wrist on both sides.
- We connect with the ends of the armhole with straight lines.
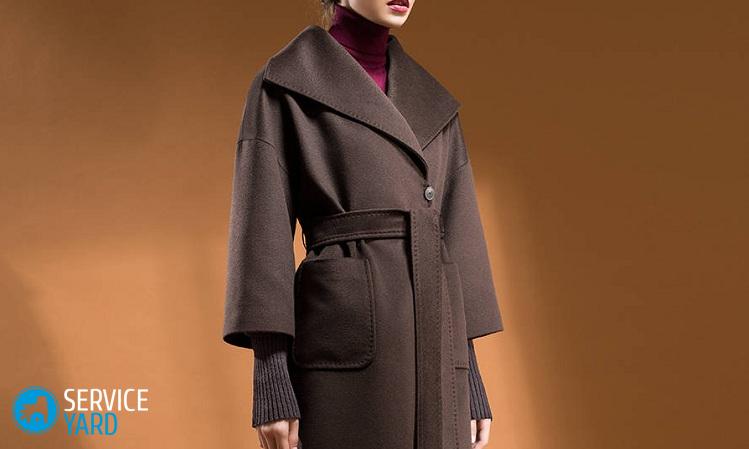
Collar
Before you sew a collar for a coat, the pattern must be cut. You got the pieces connected together - they need to be cut.
As for the collar, you can build it in a fairly simple way:
- Circle the graph lines of the neck of the shelf and back.
- Find the center of the arc.
- From the same center, draw another arc parallel to the first, but wider.
- Leave the line from the back side unchanged - it is not important in this situation.
- Divide both arcs on the front side in half.
- Connect the middle.
- From the middle of the arc, which is adjacent to the neck, set aside the right and left half of the width of the fastener.
- Using a protractor, measure how many degrees you subtracted in each direction.
- Cut the same segment in degrees from the larger arc.
- Connect the dots in pairs.
Important! You got a pattern of the simplest collar. More complex models are made in the same way, only the edge is given a different shape - with corners, without corners, with lapels, etc. For a model with lapels, it will be necessary to circle not only the neckline, but also the edge of the side.
As for the question of how to sew a collar on a coat with your own hands, the rules here are simple:
- Two parts are hidden - the upper and lower collar.
- Both details are duplicated.
- They are tightened, and the threads are laid in the corner to make it easier to turn the part.
- First, the lower collar is sewn - to the top of the back and shelves.
- The seam is ironed.
- The top collar is sewn.
How to sew a stand collar on a coat?
If you did not find a suitable pattern, but you really want just such a collar - well, you have to do it yourself:
- Draw a rectangle on the graph paper, the length of which is equal to the circumference of the neck, and the width is the estimated width of the collar.
- Circle the neck of the shelves in a long line, and then the neck of the back, starting from the corner.
- Draw a line parallel to the stroke from the corners of the opposite long side - the part should have the same width along the entire length.
- If the rack will overlap and fasten, add the width of the clasp to one of the sides.
to contents ↑Important! As for sewing, everything here is exactly the same as with a regular collar - the details must be duplicated, sewn together, first sew the inside (adjacent to the neck), and then the outside.
Stock footage
Building patterns is a rather laborious affair. But now there are other possibilities - there are many programs that allow you to build a pattern of any complexity without a pencil and paper. You just set your sizes. True, in the end, you still have to bring this pattern to normal sizes, so it’s better to learn how to build patterns on paper.
- How to choose a vacuum cleaner taking into account the characteristics of the house and coatings?
- What to look for when choosing a water delivery
- How to quickly create comfort at home - tips for housewives
- How to choose the perfect TV - useful tips
- What to look for when choosing blinds
- What should be running shoes?
- What useful things can you buy in a hardware store
- Iphone 11 pro max review
- Than iPhone is better than Android smartphones
 (No ratings yet)