Do-it-yourself wardrobe - drawings, description

There are a lot of things, the apartment is small, an ordinary closet seems too bulky and eats up the whole space? There is nothing to be done, you will have to abandon the traditional types of furniture and look for some other way out, especially if not only space but also less money than you would like. In such a situation, a do-it-yourself wardrobe can very much help out - drawings, a description and features of manufacturing you will find both in specialized publications and on sites dedicated to households. If you wish, you can make them yourself, we’ll talk about this now.
to contents ↑What is a wardrobe?
Many people associate the word “compartment” with a carriage with sliding doors. In fact, this concept is much more ancient, because this word meant the door of the carriage - others in the narrow streets of European cities simply could not be opened. So the coupe was originally intended to save space.
Then the word “compartment” migrated to furniture manufacturers - very comfortable, compact and almost indispensable in small apartments. The furniture catalogs present a variety of models of wardrobes - from expensive and cheap breeds, all kinds of colors and styles. Eyes run up, but you might not like the price. In addition, it does not always correspond to quality - there is no guarantee that expensive furniture will not fall apart from the slightest draft.
A great way to avoid such troubles is to make wardrobes with your own hands. Drawings and schemes will be obtained strictly according to the dimensions you specify, in addition, you will surely try very hard to make your product so that it lasts several years, or even decades.
to contents ↑We deal with designs
Despite the fact that all wardrobes with sliding doors are classified as compartments, they still have different designs. If you decide to make a wardrobe with your own hands, the drawings will have to be prepared, depending on the model, so first you need to deal with the types of products themselves. They all have one thing in common - doors that are located and move parallel to the plane of the facade.
The layout of the built-in wardrobe depends mainly on the location and size. The cabinet can be:
- the whole wall or the size of the alcove;
- partitions between rooms or parts thereof;
- angular;
- radial.
The scheme of the built-in wardrobe can be arbitrary. There are no strict rules:
- The first design is good in that it practically does not change the geometry of the room. But the sliding wardrobe, which occupies the entire wall, has a significant minus - it is impossible to transfer such a colossus, if you decide to rearrange it, you will have to completely disassemble and reassemble it.
- A sliding wardrobe in the form of a partition is much more mobile, it can be moved anywhere. In addition, since there is access to it from two sides, sliding doors can also be from two sides. To make such wardrobes with your own hands, you will develop drawings and diagrams on the spot with the help of designer programs.
- The advantages of a do-it-yourself corner wardrobe are obvious - all the space that usually remains outside the zone of attention of the owners is involved. Accordingly, garbage does not accumulate in the corner and there is no need to climb with a vacuum cleaner.
to contents ↑Important! The schemes of radial sliding wardrobes are complex, and in addition, such designs are more suitable for large rooms or rooms of non-standard shape (for example, this option allows you to fully use the wall in the round living room of the century before last).
What do we have with the materials?
By inventing a wardrobe with your own hands, you can make drawings yourself, including using the online furniture designer, which is now on the Internet. But for starters, one would still have to deal with the materials.
It could be:
- massif of wood;
- Chipboard or chipboard;
- plywood;
- MDF.
Wood
Wood, of course, is best suited for a sliding wardrobe with its own hands - and it serves for a long time, and beautifully, and respectably. But savings may not work, it costs much more than chipboard or even plywood. In addition, serious carpentry skills are needed to work, so novice craftsmen who are not going to further make furniture usually prefer simpler materials to process. In addition, wide boards cannot always be found on sale.
Important! If nevertheless you decide to make a cabinet from solid wood, take care of impregnation - in niches, often the humidity is higher than in other parts of the room.
Plywood
The built-in wardrobe from plywood is durable and beautiful. Plywood is a few layers of veneer that stick together under high pressure. This gives the material strength. The number of layers is divided by 3.
Important! Good plywood is stronger than wood. However, high humidity will also have to be fought - for example, with the help of drying oil.
Chipboard
The most popular material to make a built-in wardrobe, as well as a corner. It is made from chips that are pressed and filled with formaldehyde resin.
Chipboard is more environmentally friendly, since chemical emissions practically do not enter the air through the layer of laminate. Fairly cheap material, sold in large sheets. But he has a very significant drawback - the fasteners in such plates do not hold well, and the craftsmen have to apply all sorts of tricks.
MDF
The fine fraction, unlike chipboard, fasteners hold perfectly. Such a plate is also made of chips, but the wood is crushed into dust, and then pressed under high pressure. As a result, lignin is secreted, which perfectly binds the particles. The material is strong and reliable.
to contents ↑Important! If you are doing a built-in wardrobe with your own hands, be sure to pay attention to this material.
Take a tape measure
The scheme of the built-in wardrobe is impossible without such a simple tool as tape measure. One of the main tasks is to determine the size. And it doesn’t matter whether you are going to block the passage from one part of the room to the other in this way or if you are doing a long wardrobe in the hallway with your own hands.
Drawings, description and in general the whole project is determined by just the size. There are not so many sizes:
- the width of the room or niche;
- cabinet depth;
- height (it does not always make sense to make it to the ceiling, you can leave a gap of 15 centimeters).
Where to put it?
If you are planning to make a wardrobe with your own hands, look for drawings depending on which room your creation will be in. Despite the fact that all such products are similar, each of them has its own purpose - that is, those items that will take their place there. Such furniture may be intended:
- for the hallway:
- for the living room;
- for a bedroom with a niche;
- for the nursery.
Boots and jackets
If you decide to make a wardrobe in the hall with your own hands, the drawings, description and assembly diagrams depend on what you will store there. Most likely, you will put street clothes and shoes there. Accordingly - in the cabinet should be:
- 2 sections for outerwear;
- shelves for hats, gloves, umbrellas and other little things:
- shoe compartment.
Important! Why are two sections for clothes needed? Because not all of your jackets and coats are worn at the moment.In one section is placed what you need now, in another - things that are waiting for their season. In addition, a mirror can be attached to the facade. Thus, the ideal closet for the hallway consists of three sections, which are closed by three doors, on one of which a mirror hangs.
Living room
This wardrobe has completely different tasks than its counterpart, located at the entrance to the apartment. Here are stored:
- Lightweight clothing;
- Appliances;
- tableware;
- personal items;
- trinkets.
Important! You can combine such a cabinet, for example, with a music corner or a TV shelf. For this, an open section is made, and most often it is located in the center.
Bedroom
There really shouldn't be any open sections! For this do-it-yourself wardrobe is designed exclusively for bedding, underwear and some personal items. It must be hidden from prying eyes. But mirrored doors or even inserts in this case are quite appropriate.
Children
It stores toys, clothes, books - in general, everything a small owner needs. One of the sections may well be open, why not? It will house a puppet corner, a garage, a toy zoo, a TV, CDs with your favorite cartoons or books. Moreover, it is possible to combine a sliding wardrobe with a table or a secretary.
to contents ↑Take care of the tools
The scheme of the built-in wardrobe is wonderful and, of course, necessary. But without a hammer and a jigsaw, making such an object will, frankly, be somewhat problematic. So make sure in advance that your bag contains:
- wooden mallet;
- drill;
- jig for perpendicular holes;
- joiner's square;
- drills (confirmed, for wood);
- level;
- jigsaw;
- angle clamps;
- confirmations;
- plugs for screws;
- roller guides;
- dowels;
- furniture corners;
- decorative squares.
How to cut a wardrobe?
Regardless of whether you make a built-in wardrobe, angular or even radial, the details must be cut. And this is the main problem of the novice master. Cutting chipboard the first time may not work. Therefore, the most useful is to contact the company that deals with this.
To do this, you need:
- write down the overall dimensions:
- make the most elementary specification of a sliding wardrobe - a list of all the details and their sizes (it is better to indicate in millimeters).
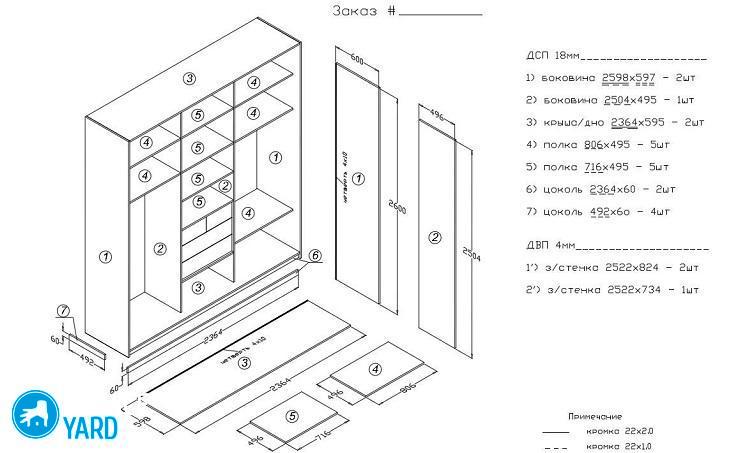
You can draw or make a sketch on your computer of your future wardrobe, print it and show it to the wizard. By the way, in the same workshop you can make hemming. A fairly simple cabinet consists of the following parts:
- 2 sidewalls;
- 2-3 partitions;
- roofs;
- lower part;
- shelves.
The size of the sidewalls is equal to the height and depth of the cabinet, minus the thickness of the floor and ceiling sheets:
- The upper and lower parts, respectively, have dimensions equal to length and depth.
- The height of the partitions depends on the distance at which the bar for outerwear will be fixed, and their depth can be arbitrary, the main thing is that it does not exceed the depth of the whole structure.
- In this case, it is necessary to subtract 100 mm from the total depth, that is, the space intended for the door opening system.
- The back wall, which is often made of fiberboard, has the same dimensions as the cabinet itself.
What to make guides from?
There are not many options here, just two:
- aluminum profile;
- steel profile.
Important! In the factory models of sliding wardrobes there are plastic guides, but they fail so quickly that amateur craftsmen try not to mess with them. But you need to know how long the guides are. Subtract the total sheet thickness from the total length and depth of the cabinet.
No less important is the type of construction. It happens:
- monorail;
- with top rail;
- with bottom rail.
Important! Monorails are placed for each of the doors. The most popular design is with a bottom rail. Its main advantage is that the doors do not collide and do not fall out.
In addition to the profile, you will need rollers and stoppers.
to contents ↑Cut? Mount
If all the elements are ready - cut, glued over, polished and saturated with drying oil, you can proceed with the installation. At this stage, the most necessary things are the level and the joiner's square, because the parallelism of lines and angles must be constantly monitored.
It is more convenient to assemble in this order:
- Mount the main box - mark on the sidewalls, base and roof the places of the holes for the screws, strengthen the structure with metal corners.
- Place the partitions - drill holes for the pins, on which you then put the shelves, the partitions themselves are also best fixed with corners.
- Check the horizontality of the base - if the floor is inclined, the doors will go back and forth without your help.
- If necessary, screw the legs.
- Fasten the guides.
- Hang the farthest door - insert the rollers into the upper guide rail, lift the door, and then put the rollers in place on the bottom.
- Check if the door moves well.
- Set the stoppers and adjust them.
- Put the rest of the door.
- Insert the pins (you can replace them with suspensions if desired).
- Install the shelves.
Stock footage
After that, it remains only to decorate your closet. For example, hang mirrors. In a word, there is nothing impossible to assemble a wardrobe. The layout of the built-in wardrobe can be quite simple. If you make a competent specification and a good plan, everything else will take very little time, not to mention the fact that in this way you can save significant amounts.
 (No ratings yet)