Sewing curtains with your own hands - patterns

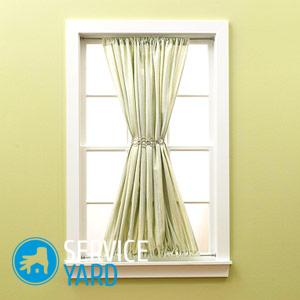
It is difficult to imagine a house or apartment whose windows are not decorated with curtains and curtains. They give completeness to any interior and the cozy atmosphere of the room. Behind them you can hide from prying eyes and protect yourself from bright sunlight in the morning. Shops offer a huge selection of curtains that vary in size, color and texture, the main thing is to choose and make the right measurements of your window. However, such a variety of proposals does not mean that curtains cannot be created by yourself. If they are sewn in the factory, then - it will turn out to repeat this at home. Today we will consider questions about sewing curtains with our own hands, patterns are attached to this material.
to contents ↑Types of Curtains
Solving the issue of sewing curtains with our own hands, we will not touch patterns yet. To begin with, we will determine the necessary style of the curtains. They are divided by the type of opening. There are 3 main models, everything else is just variations on the existing base, so if necessary to make adjustments to the design of the curtains, this will not be a problem:
- Classical curtains, perhaps, will never go out of fashion and will be relevant in any interior. They are made from a variety of materials, even such as quilted fabric. As a rule, such curtains to the hall with their own hands are a regular canvas, processed from all sides, and complemented by a light curtain made of tulle or organza. This option can be given individuality with the help of various accessories.
- A solid canvas, which is collected using a special chain - this is what Roman curtains are. They are made from a variety of materials - both dense and heavy, and from airy, transparent. Such curtains to the room with their own hands, in addition to the main function - protection from the sun and bright light, often become the highlight of the interior.
- Lush festoons below curtains made of silk, cambric or polyester. These are the main features of the Austrian curtains in the hall with their own hands. They are based on a complex lifting structure, which is driven by cords passing through the rows of rings on the wrong side.
- English, or else they are called London curtains, work on the principle of Roman curtains. The same system of cords - with rings from the inside, helps to assemble the curtain in the upper part of the window opening.
Important! It is worth noting that this option has a much greater consumption of fabric, because they are longer and wide in deep bow-like folds.
- One more option of lifting curtains - rolled. They are very convenient in those rooms where the windowsill is actively used. They can fully open the window or vice versa - create a tight defense. Roller blinds in the kitchen are very convenient, which are not afraid of drafts - they do not swell from them with sails, so close proximity of the gas stove is allowed.
Necessary tools
Before you start sewing curtains with your own hands and make patterns, it is worthwhile to carry out the preparatory stage. It will be as follows:
- Take a photograph or a sketch of the curtains to the hall with your own hands with you, so that the seller in the store helps you find the right fabric.
- Also select threads, be sure to match the fabric.
- Remember to purchase pins, chalk and a ruler.
- We also need scissors and a centimeter.
- Depending on which scheme will be used, you will need to buy braid, cord, non-woven, slanting trim and Velcro tape.
Preparatory work
To sew the curtains with your own hands, patterns, of course, will be needed. Maybe this is a more troublesome decision than buying finished products, but no one will have such a window decor. A mistress who decides to take such a step will need only decisiveness, imagination, and a little knack in the art of cutting and sewing.
Step-by-step instructions on how to sew the curtains on the windows yourself:
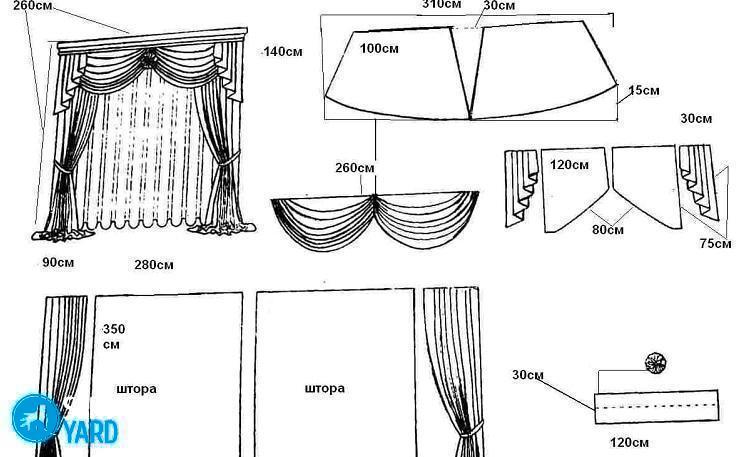
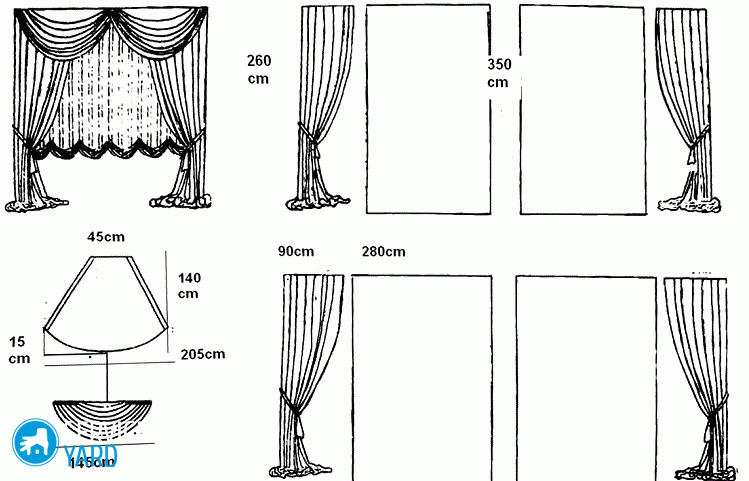
- To calculate the size of the curtain, you need to measure the height from the cornice to the floor and the width of the window opening.
- For safety in case of small errors, you should measure the material with a margin. The measurement results are transferred to the fabric, after which it is neatly cut.
- Then the edges of the obtained pieces of matter must be bent, secured with pins, and stitched using a sewing machine. The basis of the curtain is made.
- To give originality to your own work, you need to include imagination and figure out how to decorate the curtain.
General plan of work
In order to cut the fabric, you need not a small flat surface. It can be either a large table, or even a floor. On a soft or uneven surface, cutting will not work without errors. Also worth remembering:
- Cutting is best done on the right side - this will help to avoid errors in the work.
- Details or drawings can be applied to the material using chalk or remnant. Just keep in mind that with wet-heat treatment, the lines drawn with soap will disappear.
- All details for sewing curtains with your own hands with patterns, if necessary, attach to the material with pins so that the paper does not slip and the clarity of the lines is not broken.
- Remember to add seam allowances on all sides.
Before using the sewing machine to sew curtains with your own hands, it is better to sweep the pattern details in the manual mode and iron a little. After performing basic operations on a typewriter, the markup will need to be removed.
to contents ↑Mounts for curtains
In order to create curtains with your own hands, even at the stage of creating a pattern, you should think about how your curtain will be attached to the cornice. Both the processing of the upper edge and the size of the seam allowances from this edge will depend on this.
Drawstring Curtains
The ties look great on all types of fabric curtains, with the exception of Japanese and French. For the former, they are too playful and romantic, and the construction of the latter is already oversaturated with scallops, and such mounts will overload their appearance:
- You can make ties from anything - use satin and matte ribbons, braid, cords, you can also make strips of the same fabric as the curtains in the room with your own hands.
- But it must be borne in mind that for curtains sewn from dense and heavy fabric, the ties should be more durable and thicker than for curtains and tulle. Otherwise, they will not bear their weight and will tear quickly.
- This option is pretty simple. The upper edge of the fabric is bent and stitches are sewn from the wrong side, equal in length and width. They can be sewn both in one place, and at a distance of 1-2 cm from each other.
Important! Such curtains with their own hands on the pattern are rather easily attached to the cornice. Connect the ties with knots, and you're done. You can also make the ribbons more authentic and give them the shape of a bow at the very top, above the cornice or at the base.
Hinged curtains
Before you start sewing curtains with your own hands according to the pattern, you need to calculate the length from the cornice to the floor and figure out how much of this distance the curtain will be, and how much will go into the loop. These measurements are very important, otherwise it may turn out that your curtain will either not reach the floor more than 5-6 cm, which looks completely ugly, or will lie on the floor, which also does not add aesthetics to the interior.
Then, knowing the width of the future curtains in the hall with your own hands, you need to do the loop counting. They should be located at the same distance from each other.The places for stitching these elements should be marked with chalk or remnant. After proceeding with the creation of the loops themselves:
- The width of the bands must be determined independently. They can be both thin and wide. The main thing is that they blend harmoniously with the curtain. They can be cut both from the main fabric, and from contrast. In this case, it will be very appropriate to make pickups for curtains also from a material contrasting in color.
- Bend the strip in half, face inward. Sew it on a sewing machine and turn it on the front side. To give a twist, you can sew a braid or even lace on each loop in the middle.
- We connect the finished strip into a loop and pin it with pins or manually weave it to the front side so that the loops look down.
- Now we do the bend of the fabric so that the edge of the front side is on the wrong side, and the loops take up position.
- Now we make a seam on a sewing machine, while simultaneously processing the upper edge of the curtains into the hall with our own hands and attaching loops. You can also lay 2 parallel stitches to give strength to the connection. The resulting piece of fabric is connected at the ends to the bottom and is applied to the curtain, imposing a curtain on top of the resulting loop.
Important! Such loops are the most convenient in everyday life, they hold the curtain well, are conveniently located on cornices and baguettes, and are well erased.
The base of the loop on the finished curtain with your own hands can be decorated with large buttons or other decorative elements, only necessarily large, with a diameter not less than the width of the loop itself, otherwise these details will be lost in the general interior.
Curtains on grommets
Such a detail, like eyelets, is most often used for curtains in the hall with your own hands:
- The curtain in this room is usually sewn from dense, heavy fabric. The fastener must support such a weight, in addition, the fabric will constantly push and move.
- Cringles will not only facilitate the process of sliding the curtains along the ledge, but will also help to make a bright accent, because with the help of these metal or plastic elements on the fabric the same, uniform folds are formed.

For the curtains to the hall with your own hands, the cringle, which consists of two parts - blocks and rings, is most often used. They need to be installed on the fabric. This will require:
- Hole punch to create holes;
- Scissors small and large, tailor's;
- Chalk or remnant for drawing the necessary marking;
- Centimeter tape for measurements;
- Iron to duplicate fabric;
- Hand press for metal parts of eyelets;
- Grommet for reinforcing the upper cut of the fabric.
After you have cut the curtains with your own hands according to the pattern, bend the side edges and process the bottom of the curtain. Only after that, on a flat surface, proceed to marking the fasteners:
- Count how many eyelets you need and how to arrange them symmetrically on the fabric.
Important! Note that there must be a distance of at least 2 cm from the edge of the curtain to the circumference of the eyelet.
- From the inside, with a hot iron through gauze, glue the grommet. Its upper edge should be 2 cm below the edge of the fabric.
- Then bend the edge of the reinforced top on the sewing machine.
- Next, make holes for the eyelets in the future curtain in the hall with your own hands. For metal sleeves you will need a hand press, in the case of plastic parts this option will not work, since they can simply burst due to pressure. Pick up small scissors and cut the eyelet outline by hand.
Important! The diameter of the resulting hole should be equal to the diameter of the inner ring of the sleeve. This will make the mount more reliable.
- Insert the lower part of the eyelet from the wrong side, and the upper part from the front. See that the fasteners coincide with each other, and the circumference for them was not too big. Then squeeze together both parts with the edges of the fabric in the middle. After a characteristic click, we can assume that the fastener element is installed. Thus process the entire upper edge of the fabric.
A good tool, accurate work and high-quality eyelets are the basis for a successful installation with your own hands. After this stage, do-it-yourself curtains can be hung in the room.
Curtains on the curtain
Curtains on the curtain - the simplest and most versatile model. Depending on the type of fabric, they can play the role of curtains or light tulle. This kind of curtains in the hall with your own hands will please any housewife doubly if it is performed according to the following understandable instructions:
- First of all, it is necessary to measure the width and height of the window opening.
- To the obtained numbers add 2-3 cm to the hem on each side. To accurately measure the height of the opening, it is necessary to measure the distance from the cornice to the floor.
- When sewing curtains with your own hands on a pattern with drapery, the width of the window opening should be multiplied by a factor from 1.5 to 2.6, depending on the frequency of folds on the future product. For example, if the window width is 2 m and the drapery coefficient is 1.7, then the width of the fabric should be at least 3.4 m.
- After the size of the canvas is determined, add 2 cm to the resulting number to create a drawstring pocket. This is necessary so that the finished product moves along the ledge.
- If you need to decorate the top of the curtain with ruffles, then add a few more centimeters necessary for sewing ruffles.
- First you need to cut the canvas by the standards that were taken. If the finished product should be decorated with ruffles, frills and other elements, we sweep them to the future curtain in the hall with our own hands.
- Then iron and overcast a bend of fabric 2 cm wide along the lower edge.
- Make a double hem along the upper edge, which should be enough to form a drawstring.
Important! The width of the hem should be such that the wire or rod on which the curtain will be attached easily passes into the hole. Then the hem is sewn on a typewriter.
- Do not forget to sew the lower hem and all the decorative elements that complement the curtain into the hall with your own hands.
Stock footage
When creating a do-it-yourself curtain with a pattern, never be afraid to experiment, because what is created with your own hands is the most invaluable. And such an experience is very positive and necessary. It is enough to make the correct measurements of the width and length of the window opening. And such a seemingly insignificant element, such as fastenings to the cornice, can give any curtain an individual and original appearance.
 (No ratings yet)