Do-it-yourself napkin holder
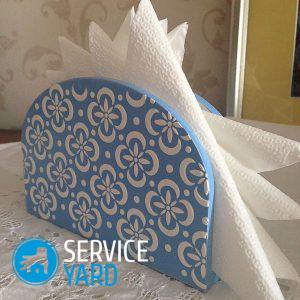
A napkin holder is an indispensable attribute of a festive and everyday table. It not only fulfills its function, but also serves as a decoration. This kitchen item can be purchased at the store, but made independently it will look much more interesting. Moreover, a do-it-yourself napkin holder can be made from any means at hand, whether it be ordinary cardboard, old disks or pencils. You will find several simple options to help you transform your kitchen and solemnly design a table in this article.
to contents ↑What materials can I make a napkin holder?
In fact, there are many materials from which you can make a napkin holder yourself. It all depends on your flight of imagination and the availability of improvised tools. The stand can be made of ordinary cardboard, lined with a beautiful cloth or glued with colored paper. Special craftswomen can use plastic bottles for detergents for this purpose. Napkins from clothespins or old pencils look beautiful. You can also make them from:
- puff pastry (a great option for culinary craftswomen);
- shells (or rather, from its wings);
- unnecessary CDs;
- plywood;
- beads;
- wooden blocks (you need to saw them beforehand);
- napkins.
Cardboard napkin holder workshop
Consider a master class on how to make a do-it-yourself napkin holder. For work, we need the following tools and materials:
- thick cardboard;
- 2 sheets of colored A4 paper;
- PVA glue;
- “Moment Crystal”;
- craft tape;
- scissors;
- stationery knife;
- stationery clips or clips.
Here's what the whole creative process will look like:
- At the beginning of the work, we cut 4 semi-circles and 2 rectangles for the bottom from the prepared cardboard.
- Using a kraft tape we connect the butt parts of the walls and the bottom so that the mounting tape fastens them from the outside and the inside.
- We circle the cut blank on colored paper, leaving about 3 cm for allowances on all sides.
Important! Please note that for decoration you can choose not paper, but bright fabric. The algorithm for working with it will be the same.
- Using PVA glue, glue the cardboard blank on the front side with colored paper. We do this carefully so that there are no folds or swellings.
- Then we trim the side parts of the “cover” and, bending them, glue on the inside of the workpiece.
- Further along the perimeter of the edge we make incisions, not reaching the end of about 4 cm. These incisions are glued to the wrong side.
Important! In order to glue well, you can use clips or clothespins.
- In order for us to make a stand for napkins with our own hands, we leave the main part to dry, we return to the remaining blanks, which should be located inside the existing napkin holder. To achieve this, you need to cut about 2 mm on each side of the product. We check by putting them inside.
- To finish the inside of our stand, it is advisable to choose a paper of a different color. Glue the blanks on it so that there are at least 1 cm of allowances.
- At an angle of 45 degrees we cut corners, making zigzag cuts along the edge of the parts
- We connect the side parts of the bottom, leaving the long parts free.
- We bend on them and glue the left allowances.
- At the end, you need to connect the inner and outer parts of the napkin holder by gluing the bottom parts so that the non-glued allowances are fixed on the side walls.
- Then, using “Moment-Crystal”, we glue the side parts.
- Wait for the glue to dry, and the do-it-yourself napkin holder made of cardboard is ready.
Napkin holder from old disks
If you want your kitchen to be decorated with a do-it-yourself napkin stand made of old disks, follow the step-by-step instructions:
- Prepare the materials: 2 CDs, scissors, ruler, pencil, colored paper, cardboard, PVA, Moment glue, varnish, stationery knife, decorative elements.
- Cut the discs after marking the cut line with a marker. It is better to do this with ordinary scissors, leaving small allowances in case they need to be aligned.
- Make small pieces of newspaper scraps.
- Seal the holes on the discs. To do this, grease each layer of paper with PVA glue and, after waiting for them to dry, glue on the holes.
- You can use gift paper to decorate your napkin holder. From it you need to cut a pair of parts of the same size as the walls, and a pair of parts that exceed this size by 5 mm.
- Glue the sides of the stand.
- Decorate the product to your liking - you can use beads, ribbons, lace, beads for these purposes.
- The bottom also needs to be pasted over with colored paper.
- Join all the parts together using Moment glue or a silicone gun.
to contents ↑Important! If desired, cover the finished product with several layers of varnish.
Stock footage
In this article, we have offered you only a few examples so that you understand how simple and easy it is to create a really interesting napkin holder with your own hands. Experiment with different materials, then your kitchen will always be that island of comfort and beauty and a truly homely atmosphere.
 (No ratings yet)