DIY fluorescent lamp repair
In offices and in the kitchen, in the bathroom and in the bedroom, in any room, there are always fluorescent lamps. Such lamps are extremely profitable, because they are energy-saving, but, unfortunately, they also sometimes break down. Do-it-yourself repair of a fluorescent lamp is a fairly simple task, but you need to understand the details, which we will tell you about.
to contents ↑Determine the degree of damage to the lamp
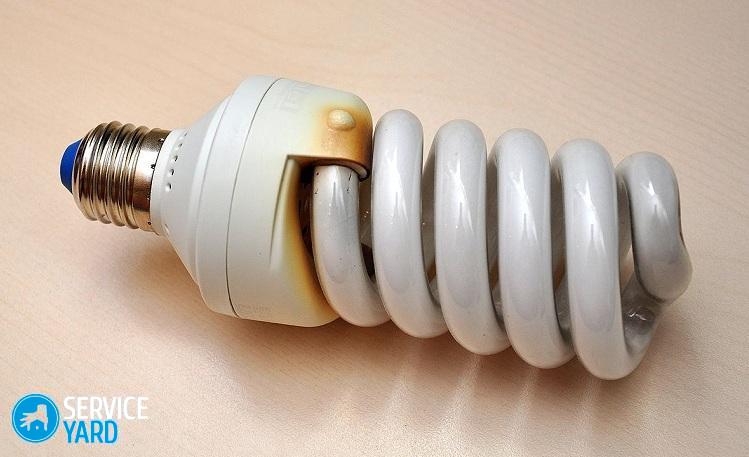
Before you start repairing a fluorescent lamp, you must assess the extent of damage and the scope of work. In the event that the light source does not react in any way to the efforts of switching on, we recommend that you inspect the bulb. Approaching the end of the service life declared by the manufacturer, the phosphor burns out, and the light becomes much dimmer.
Important! This phenomenon is completely commonplace for such bulbs, respectively - it is useless to disassemble the entire body, because the bulb is not repairable.
But in the case when the light source ceases to turn on much earlier than the due date, the main causes of failure are the burnt electrode thread, as well as the failure of one of the fragments of the ballast. In these cases, you have to disassemble the product:
- After you examine the lamp design more closely, you can see that at the base of the bulb there is a housing in which the ballast, consisting of two parts, is hidden.
- This case must be opened, for which special latches are provided in advance. You can disconnect the housing elements using an ordinary screwdriver.
Important! All actions must be carried out slowly, as there is a risk of damage to the wires directly.
- You can check the performance of the electrodes with a multimeter. The resistance of these threads should be in the range of 10-15 ohms. It will be quite simple to identify which thread has burned.
- If there are no doubts about the performance of the electrodes, then the breakdown is probably due to problems with the ballasts.
Search for defective ballasts
Assessment of the state of the board must first be done visually. It is recommended that you carefully inspect all parts of the circuit on both sides. Under severe conditions of use, breakdown or short circuit may well occur.
In this case, it is simple enough to notice a change in the external parameters of one or more parts of the board: deformation, blackening, etc. If problems are visible with the naked eye, still check the entire circuit.
Fuse
It is quite simple to check it - this element connects the base, it is also the central contact, together with the board. The fuse is coated with a special insulating material and connected to a resistor.
Determining its performance is performed using the same multimeter. Install one of its contact probes in the area where the fuse was fixed, and the other probe directly to the board in the appropriate location.
The working part allows you to see the set resistance level, which is within 10 ohms. But if it burns out, the multimeter will show a unit.
Important! In the event that the problem actually lies in the fuse, remove it, and bite it off closer to the body of the resistor itself. This will allow you to solder a new part without any difficulty.
Flask
Before starting to check the board, check the electrodes of the light source, which are located in the bulb. How this is done is described above. But what to do if one of the threads is still burnt? It is unlikely that it will be possible to replace it with a new one for the simple reason that the necessary components are missing.
But even in this case there is a way out - you can use a resistor with the same resistance level. You can determine the value of this parameter by checking both threads, of which one is likely to be working. The resistor must be soldered in parallel with the thread that is burnt.
Important! In addition, we recommend checking absolutely all semiconductors that are on the board.
Resistors and transistors
In order to evaluate the performance of transistors, you need to carefully eliminate them from the circuit. This need is explained quite simply - the p-n junctions of this element are shunted by the transformer winding. When you determine the failure, you can replace the transistor with a new one with the same parameters.
Important! The type of part does not matter, because, subject to repetitive characteristics, the main difference in this case can only be the dimensions of the case.
The resistance of the resistors themselves must be checked in exactly the same way using a multimeter. You can try to consider the characteristics on the product body. If there is another, fully working lamp, it is permissible to make a comparison of all the parts, ringing and thereby determining their characteristics.
Capacitors
And in this case, all the actions are similar to those announced earlier when checking the remaining components of the circuit. When an assessment of the condition of the part indicates the presence of a problem, we recommend replacing it.
Visually, many capacitors in case of a malfunction immediately become deformed, bloating is observed, and leaks also appear.
Important! If you purchased a cheap Chinese lamp, the failure of this element is the main cause of the malfunction of the light source.
Assemble the lamp
Repairing energy-saving light bulbs with your own hands will cost inexpensively, because the cost of components is incredibly small. Therefore, it is quite possible to purchase several sets of elements at once, so that in the future, in case of malfunctions with a lamp, they can be quickly solved.
Before assembling the housing, check the lamp operation. To do this, connect the wires and insert the lamp directly into the lampholder. If it glows, it means - you can finish the assembly work. In this case, it remains only to return the board to its place, to connect both parts of the case so that they click into place.
to contents ↑How to avoid frequent lamp breakdowns?
The reasons for the need to repair the fluorescent lamp with your own hands are many: breakdowns, short circuits, burnt spirals and the like. To avoid the frequent change of such lamps, as well as to extend their service life, adhere to certain recommendations:
- Provide heat outflow during heating, for which it is necessary to use more open and wide lampshades or shades.
- We also recommend that you turn off and on a light fixture with similar lamps less often. When dealing with low-power sources, you can leave them turned on.
Stock footage
A daylight lamp is an excellent solution to the lack of natural light. Therefore, if you have chosen such a device for your room, be prepared to be able to repair it so that you do not have to be puzzled every time by buying a new device, because it costs several times more.
 (No ratings yet)