Crochet do-it-yourself kitchen mitts - diagrams
Regardless of the growth rate of modern progress and the high level of equipment of kitchen facilities with various technological achievements, housewives have been using tacks for many years and are unlikely to ever abandon their use. But the most important thing is that you can crochet oven mitts with your own hands. The schemes and master classes given in this article will allow you to update your kitchen with such useful things. Despite the fact that many ideas seem complicated, in reality this is not so. If you know how to knit with ordinary loops and columns, then there will be no problems.
to contents ↑Kitchen pot holder
Do-it-yourself crocheted oven mitts look pretty cute, especially if they are made in the form of original flowers. To make such a product, prepare yarn in three shades, for example, purple, orange and pink. In this case, the brighter the better.
Important! To crochet such kitchen oven mitts with your own hands, you will not need much time. It is better to make several such products in order to symmetrically decorate the kitchen with them.
Knit as follows:
- Dial 9 air loops, lock them into a ring.
- Knit 18 single crochet stitches.
- To make the flower petals smooth and beautiful, dial 23 loops, then close the knitting at the place where the chain began. As a result, you get the first petal.
- Before starting to knit a new petal, knit one single crochet. Then re-dial the chain of 23 loops. As a result - you should get 9 petals.
- Next, tie each petal in a new row with single crochet columns. In the fourth row, tie each petal with 25 columns.
- Fifth row - each petal has 12 columns, make 3 columns of the central loop and 12 single crochet.
- Change the thread and continue knitting with a different color.
- Change the thread every 8-9 rows, that is, starting to knit in the third color.
- You will get slightly wrapped petals. To connect them together, tie in a circle all the work.
- Turn the resulting flower over, knit it in the other direction. Each petal is 15 single crochet columns.
- Tying complete a small loop.
to contents ↑Important! The beginning of tying the petals should fall on their central upper part, due to which, at the end of knitting, you will get a ready-made place for knitting the loop.
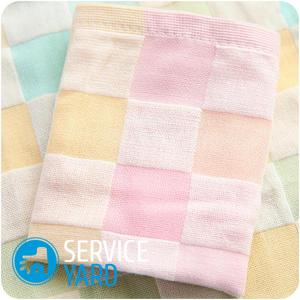
DIY square tack
No less attractive look square products. Take this simple workshop as a first lesson. The basic principle of knitting is from the corner of a single crochet.
Tie the product as follows:
- Dial three air loops, close them with a ring.
- Knit one column in the first loop, then three in the second, one in the third loop.
- To form an angle, tie three columns in each row of the middle column.
- Tie an elastic band, tie its reliefs with a chain stitch, using a colored thread.
- Tie the edges of the potholder with a shell, and at the same stage, make a loop for hanging.
Important! The square model can be connected in a different way, for example, picking up a pigtail and using it to make crochet posts with an elastic band. In this case, it is necessary to turn the product from the front to the wrong side.
These are the simplest crocheted do-it-yourself knit tacks, because even their patterns are not needed for their manufacture.
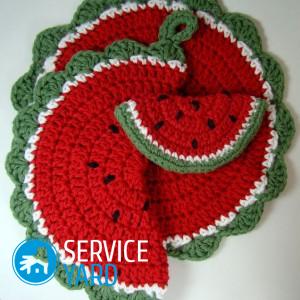
to contents ↑Berry potholder
More often, this name means the “Strawberry” model, because our great-grandmothers also decorated the kitchen with such accessories. If you are a beginner, then use the most affordable, classic version of knitting. What kind of threads is better to crochet the potholders of such a plan? In this case, it is better to use synthetic yarn in green and red. And also do not forget to get a hook 1.5.
Follow the instructions below:
- Tie a chain of air loops. To get a standard size product, 16 loops will be enough for you.
- Lock the loop in the ring.
- Bind eight single crochet stitches for the berry. Next, add loops to make the product slightly larger. You should have 24 loops in the ninth row.
- Then, knit two rows with ordinary columns without adding loops and crochets.
- Reduce the loops over four rows. Through such manipulations, you will create a strawberry-shaped potholder.
- In the same way, tie another part, fasten the berries together with a hook and yarn along the edge loops.
Such a product will delight daily not only you, but also guests at home.
to contents ↑Kitchen accessory “Cockerel”
Handmade crocheted oven mitts in the shape of pets look not only interesting enough, but also elegant. If you follow all the steps clearly according to the instructions below, a wonderful cockerel will appear in your kitchen, which is incredibly convenient to use.
Scheme of work:
- Choose the right yarn, preferably an acrylic thread, but not woolen. Acrylic products can last an incredibly long time.
- Draw on paper a sketch of future work so that the tack is the right size.
- First, tie the main part so that it resembles a pear in shape. Dial 30 loops, knit in single crochet stitches.
- In the process of knitting the columns, reduce the loops in the rows where it is needed according to the scheme. That is, do it symmetrically to make a pear.
- Check the knitting with the sketch.
- After you make one pear, proceed to manufacture the same part by analogy.
- Stick the two pears together. Tie all the posts over the edge.
- Run single crochet at the edges of the product to form rooster wings.
- From yarn of other colors, make a beak, eyes and a beard so that the cockerel is as close as possible to a real bird.
Stock footage
Now you know how to knit oven mitts with your own hands of various shapes, and to create them you need a minimal set of tools and materials. Any idea can be independently realized.
 (No ratings yet)